Getting started

Set up StenoDesk, step by step.

Thirteen short steps from a new account to your first invoice. Do them in order the first time; after that StenoDesk fills most of this in for you. Prefer a person? Book a free 30-minute setup call.

Tip: click any screenshot to open it full size.

1

Fill in your profile

Your name, business and license number go on invoices, worksheets and appearance pages.

  1. Open Settings, then Profile, and press Edit.
  2. Add your business name, phone and state.
  3. Enter your Certification / license number (CSR, CCR, RPR or similar). It prints on your worksheets and appearance pages.
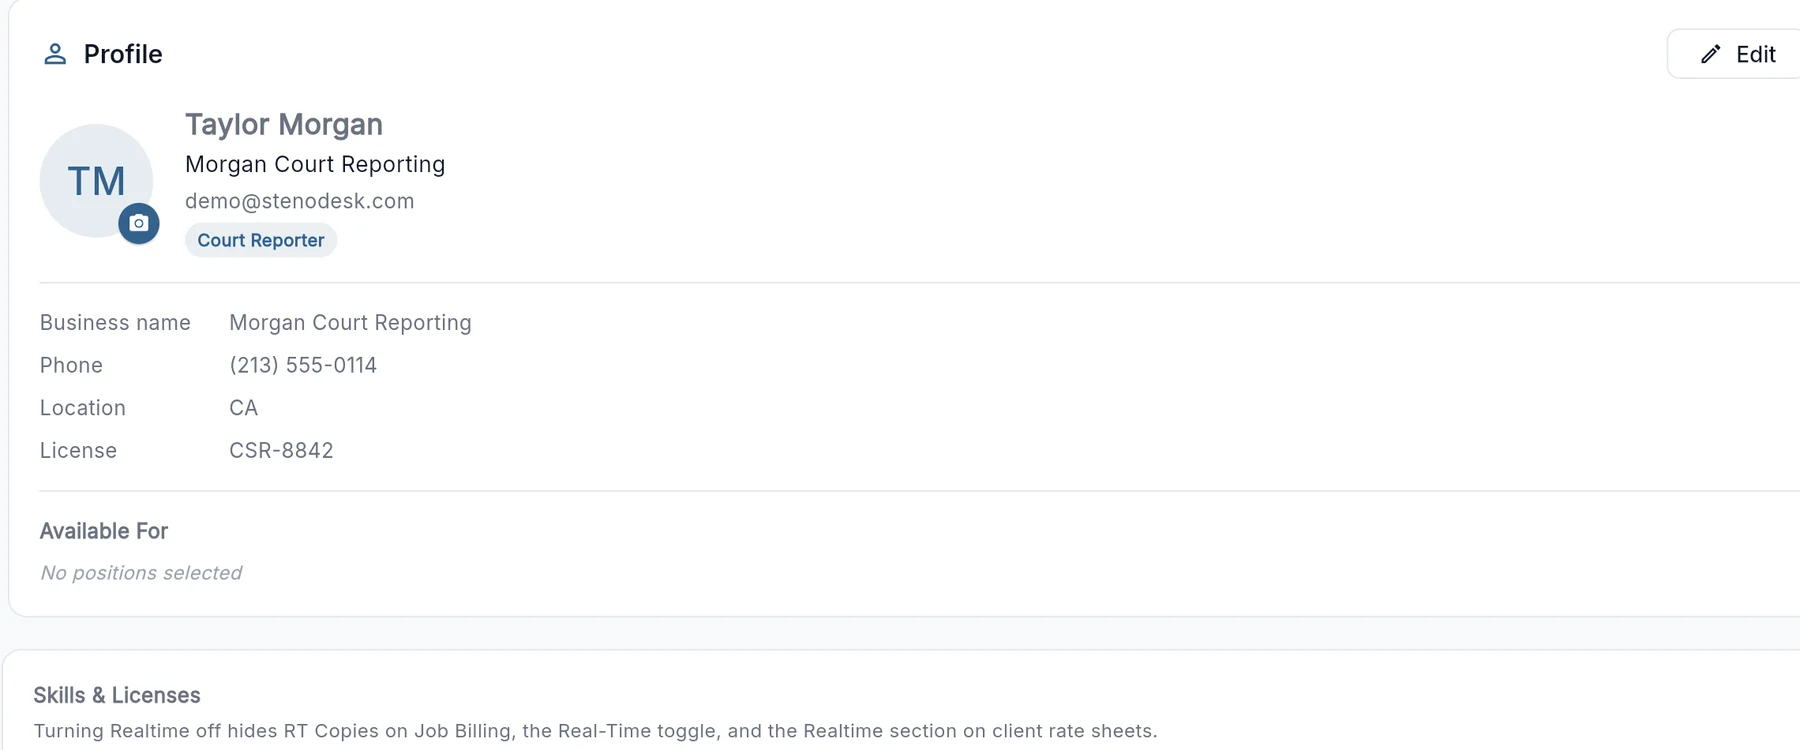
Settings, Profile card with business name, phone, location and license number
2

Set your invoice preferences

Decide once how your invoices look and are numbered. Every invoice follows these rules.

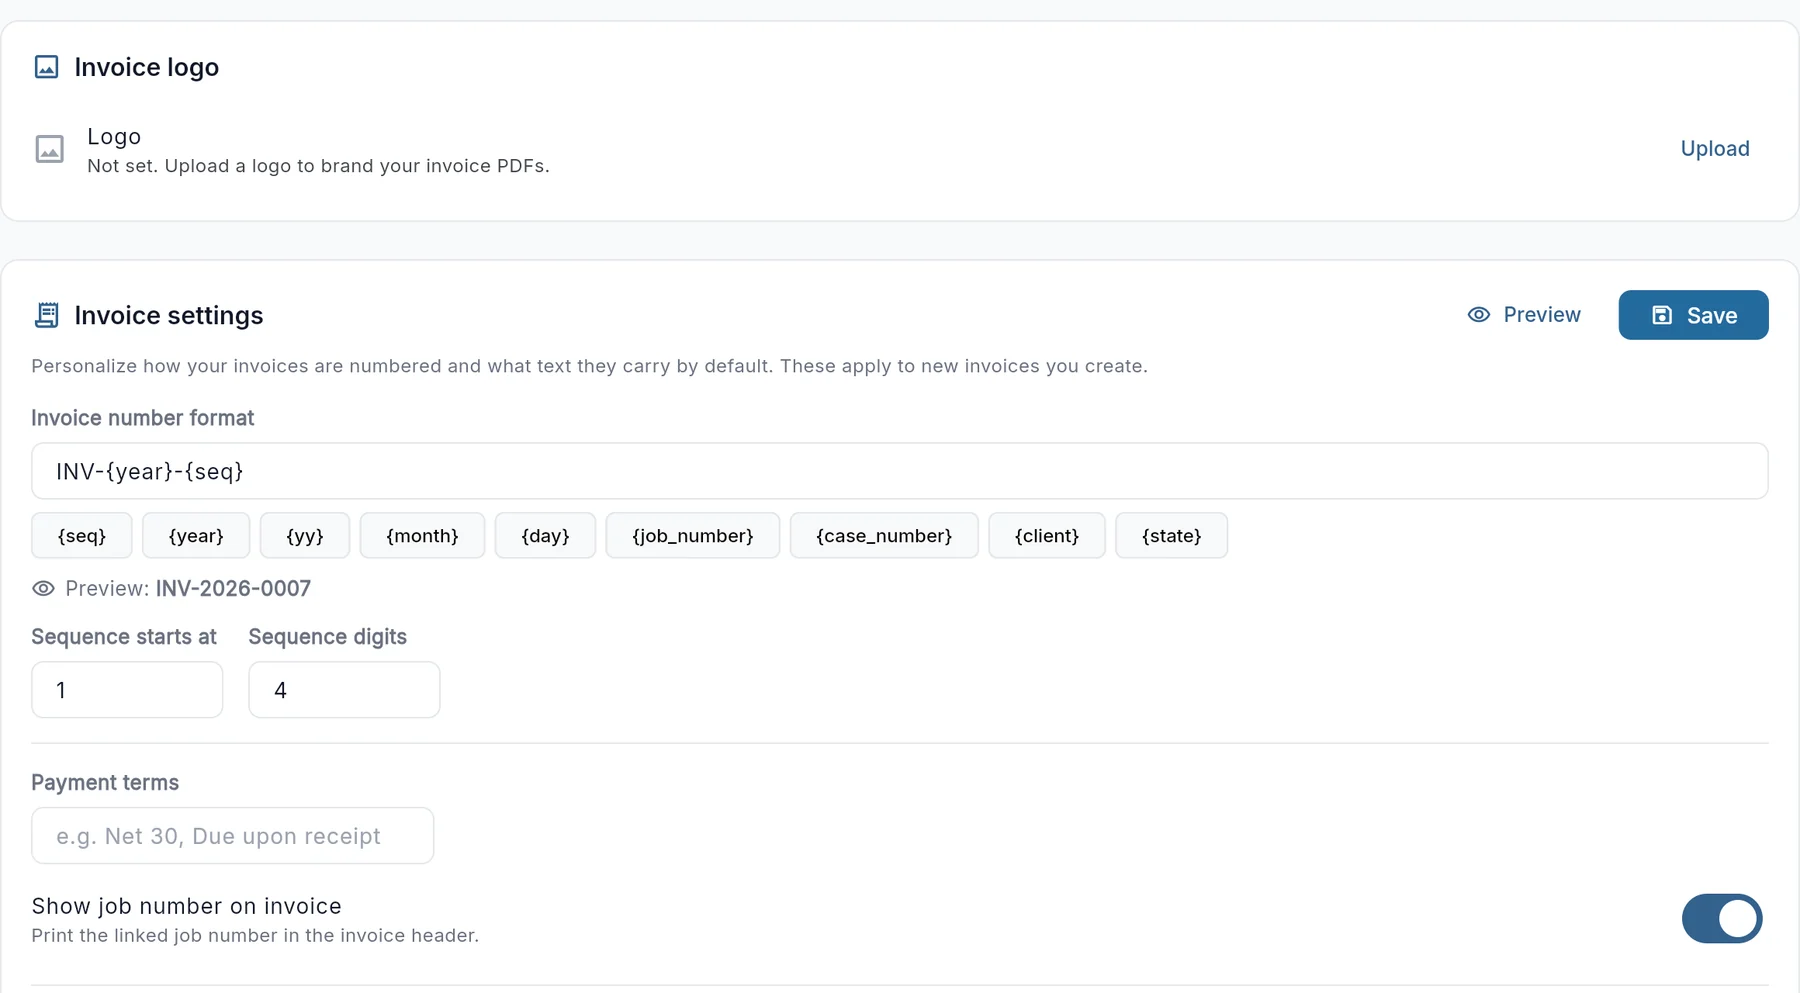
  1. Open Settings, then Invoicing.
  2. Upload your logo, then choose your invoice number format and where the numbering starts (handy if you are moving over from another system).
  3. Set your payment terms, for example Net 30.
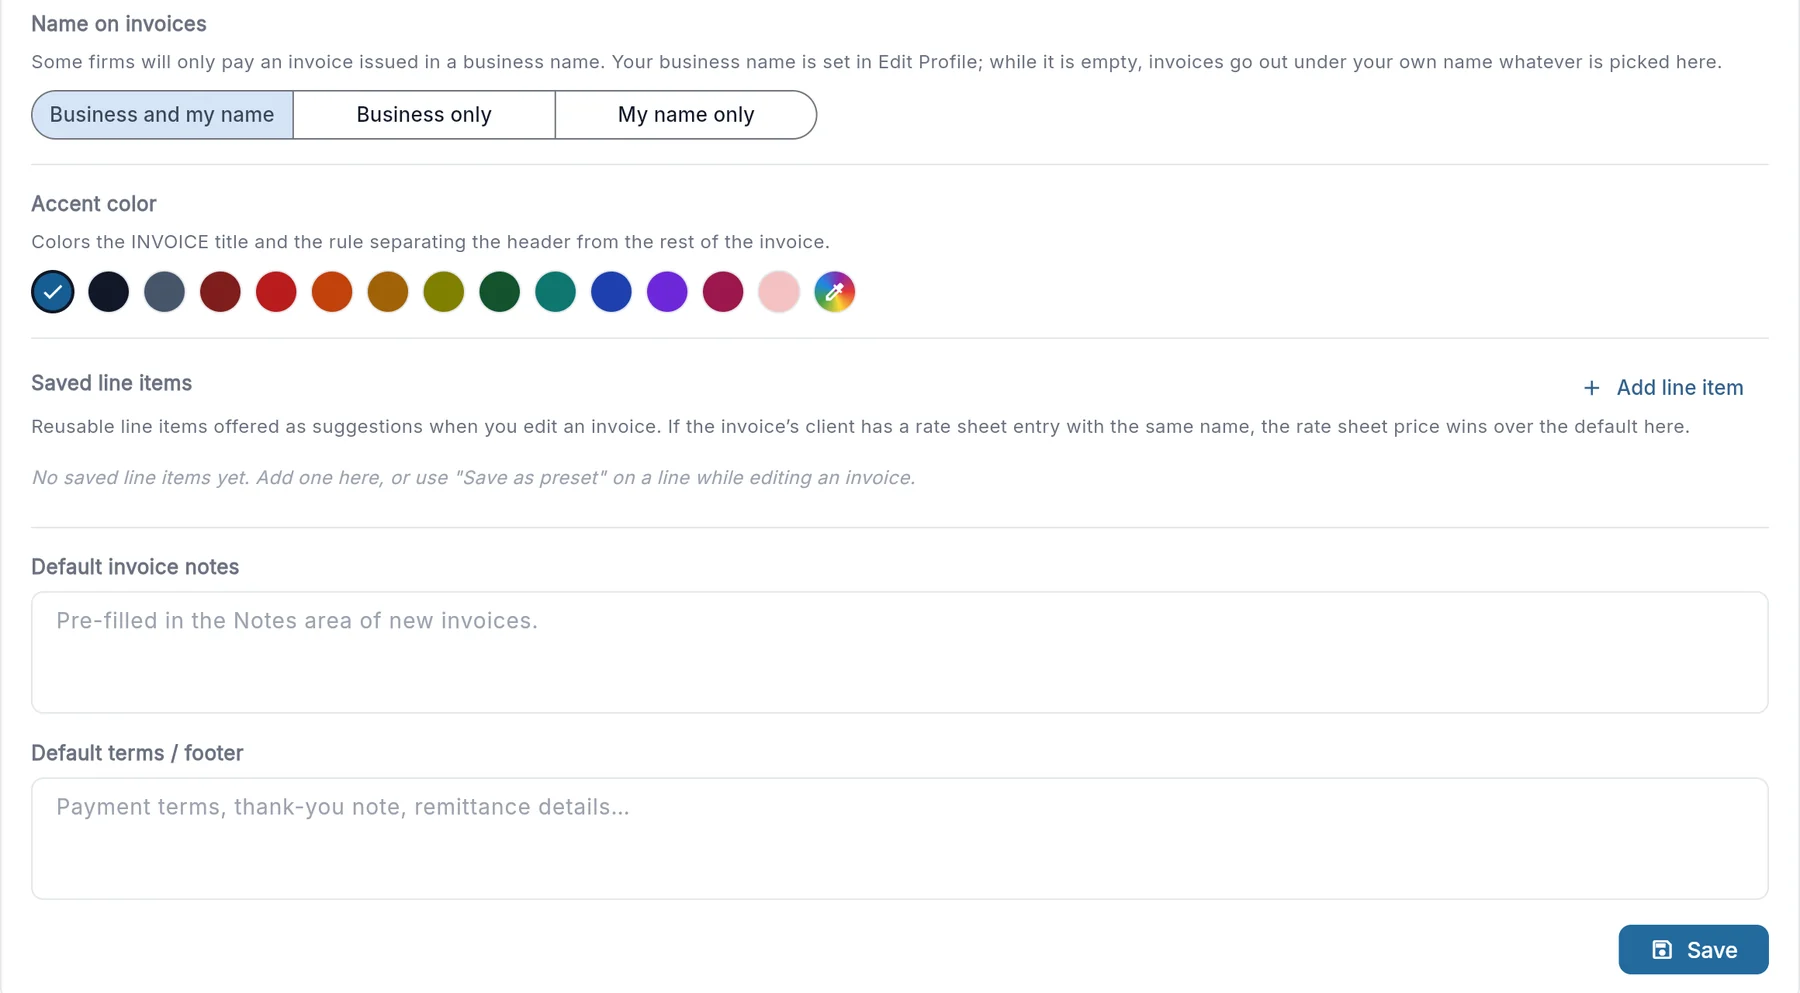
  4. Further down, choose whose name appears on invoices, pick an accent color, and add default notes and a footer, such as remittance details.
  5. Press Preview to see a sample, then Save.
Settings, Invoicing: logo, invoice number format, sequence and payment terms
Settings, Invoicing: name on invoices, accent color, saved line items and default notes
3

Connect your email

Your Gmail or Outlook inbox inside StenoDesk, so job requests turn into jobs in a couple of clicks.

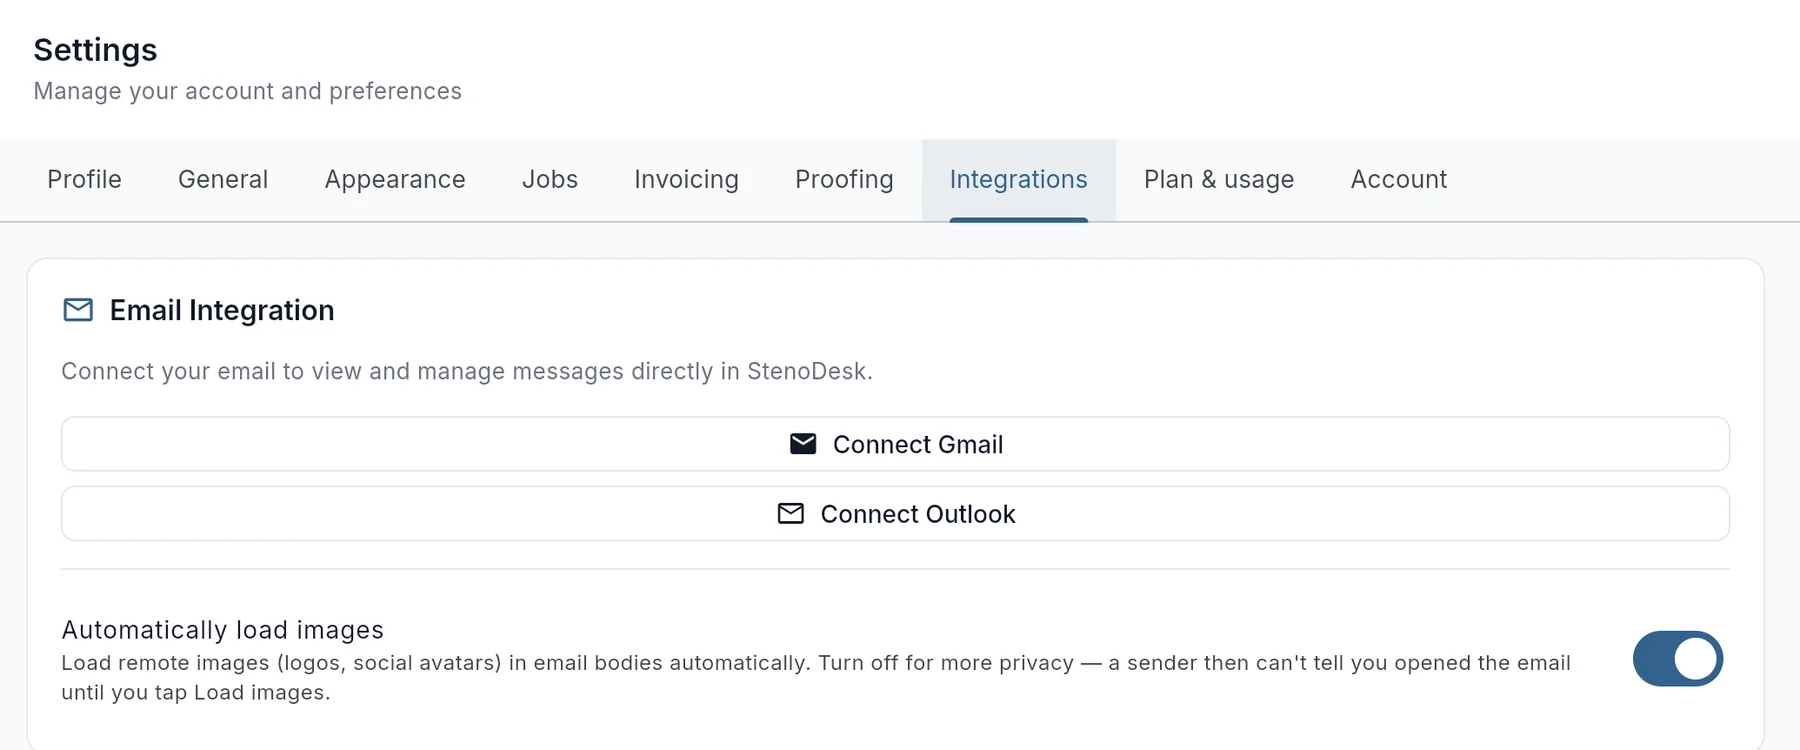
  1. Open Settings, then Integrations.
  2. Press Connect Gmail or Connect Outlook, sign in and allow access.
  3. Your inbox now appears under Email in the menu on the left.
Settings, Integrations, with Connect Gmail and Connect Outlook buttons
Your mail stays in your own Gmail or Outlook account. StenoDesk shows it; it does not move it anywhere.
4

Add your first client

The firm or agency that books you. Every job belongs to a client.

  1. Open Clients and press New Client.
  2. Fill in the firm name and the email for invoices. Address, phone and contacts can wait.
  3. Have their business card? Use Scan business card with your phone and StenoDesk fills the form in for you to check.
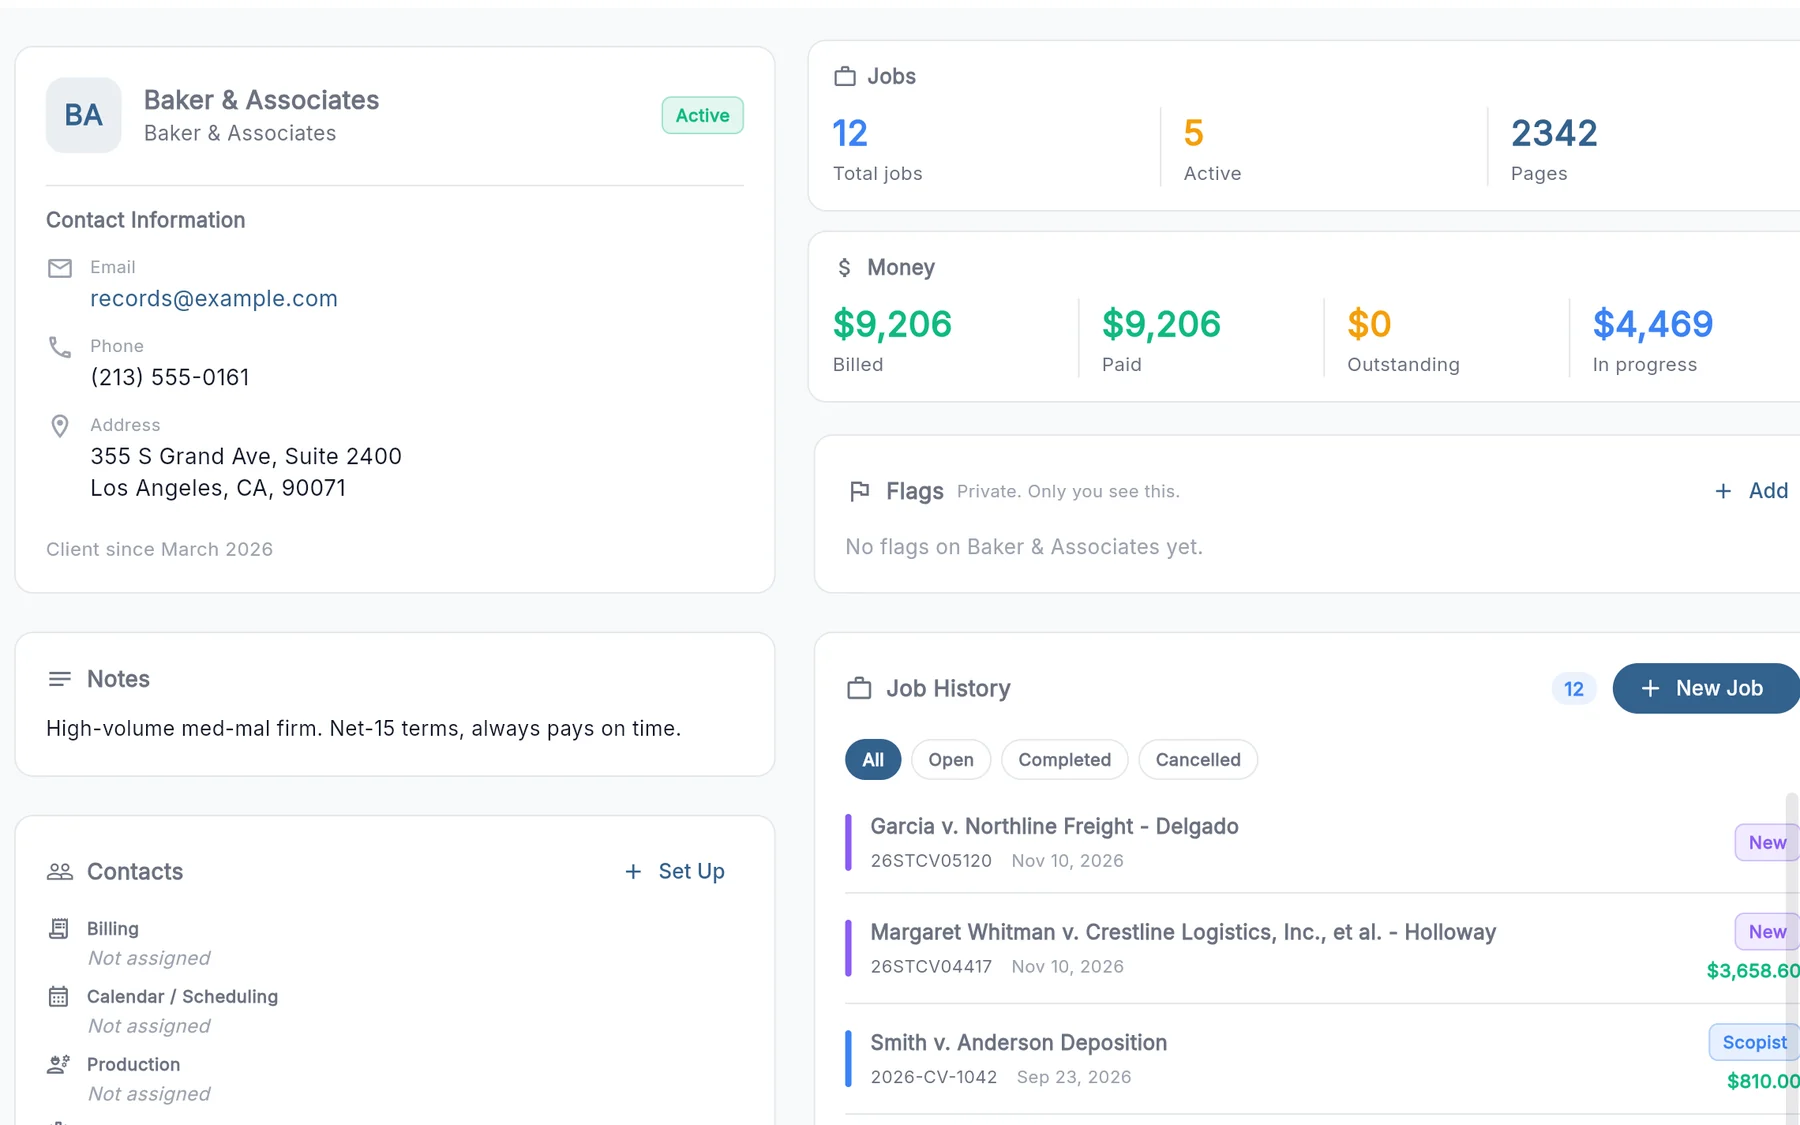
A client page with job and money totals, contact information, notes and job history
Each client page keeps their jobs, invoices, contacts and email history together, with jobs and money at a glance.
5

Add your rate sheet

Your rates for this client: per page, expedites, copies, roughs, per diem and more. Invoices are built from it, once it is approved.

  1. On the client page, find Rate Sheet.
  2. Press Edit to type your rates, or Import from File to read a rate sheet you already have (PDF, Word document or photo). Check what it found, then save.
  3. Press Mark as Approved. StenoDesk bills only from an approved sheet; until then, invoices for this client come out empty. If the client should confirm the rates first, use Email Rate Sheet instead and the sheet is approved when they accept.
  4. Most reporters reuse one sheet: press Save as My Default and new clients start from it.
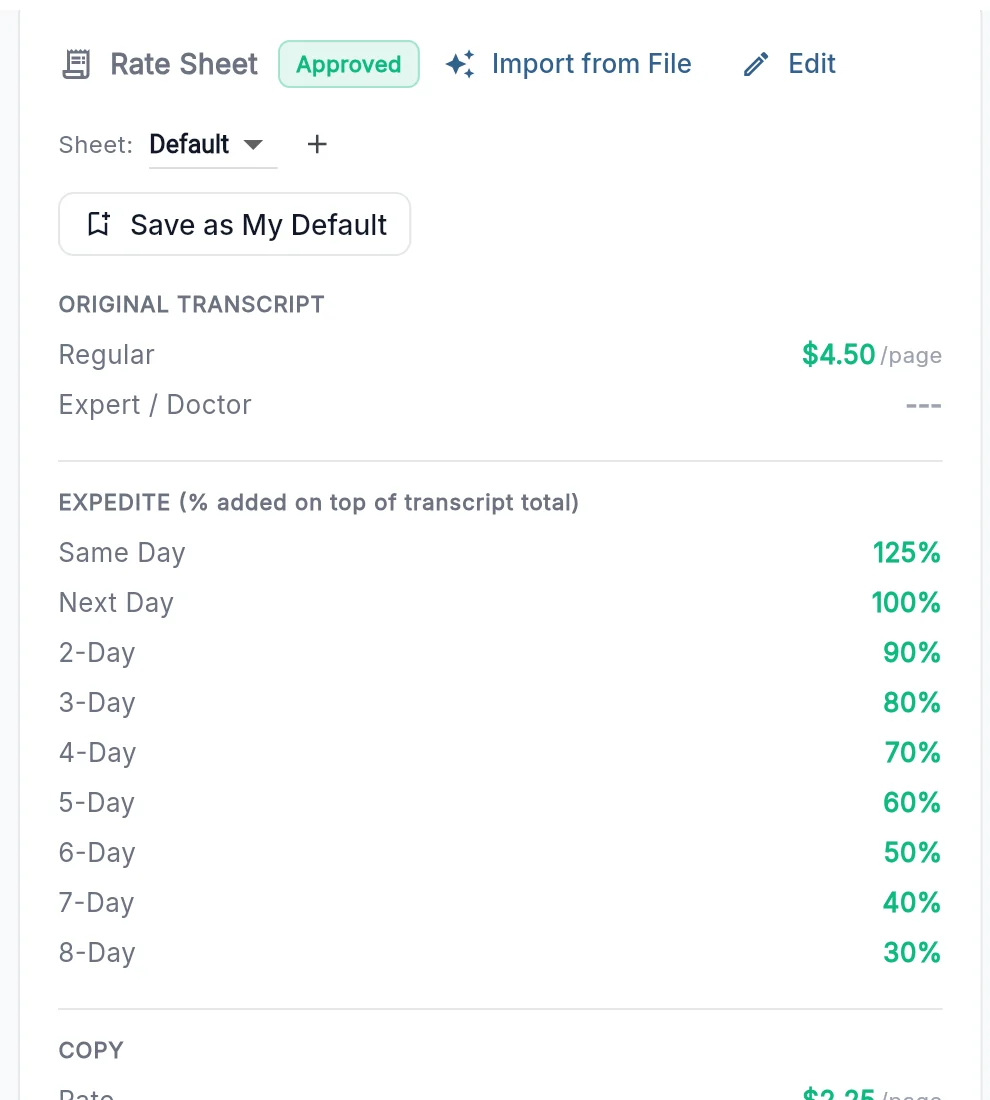
Rate sheet, marked Approved: original transcript rates, expedite percentages and copy rates
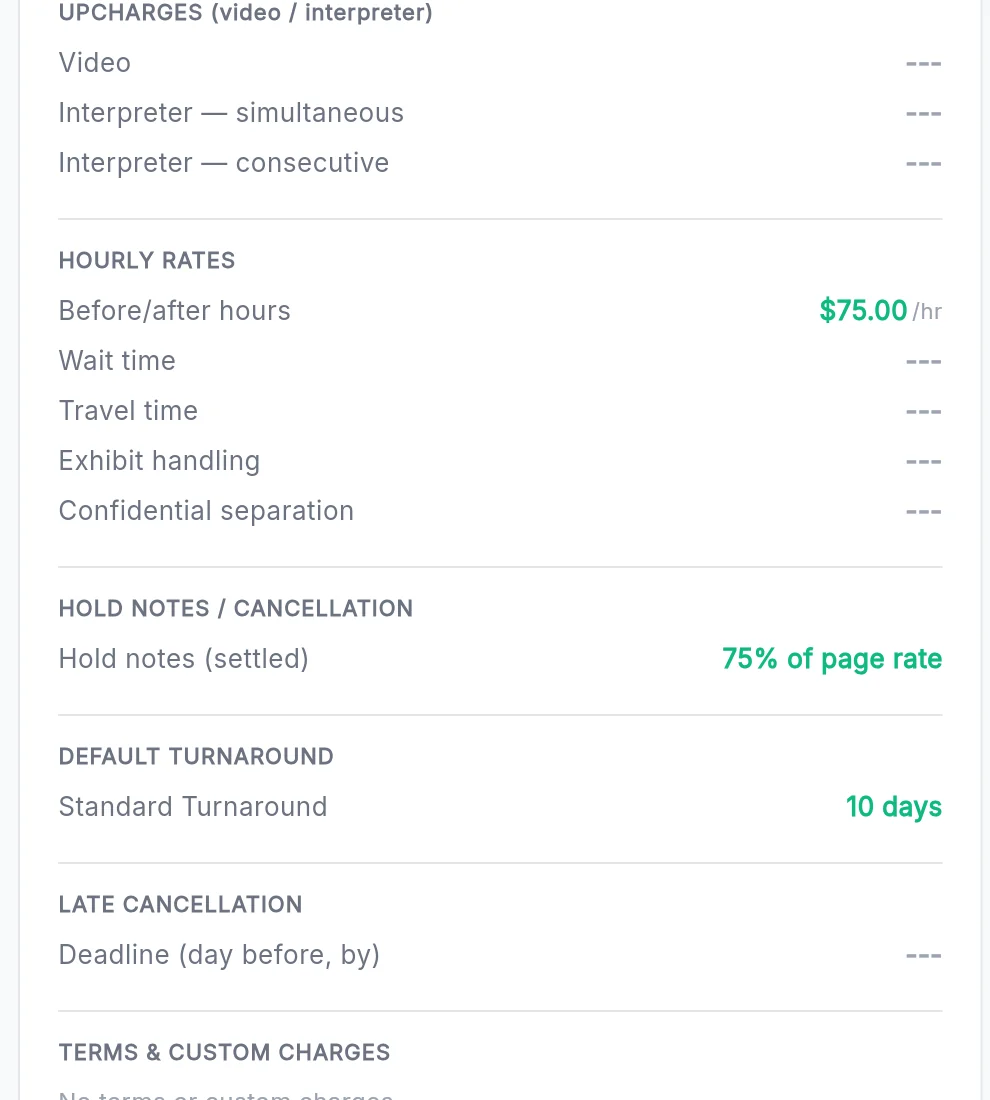
Rate sheet: hourly rates, hold notes and the default turnaround of 10 days
Set the turnaround and due dates fill themselves inEnter the client's Default turnaround in days on the rate sheet. Every new job for that client then gets its due date automatically: the job date plus that many business days, skipping weekends. You can still change any due date by hand. Holidays are not skipped, so check those.
6

Choose how jobs are named

Do this before your first job: StenoDesk titles every new job for you from this pattern.

  1. Open Settings, then Jobs.
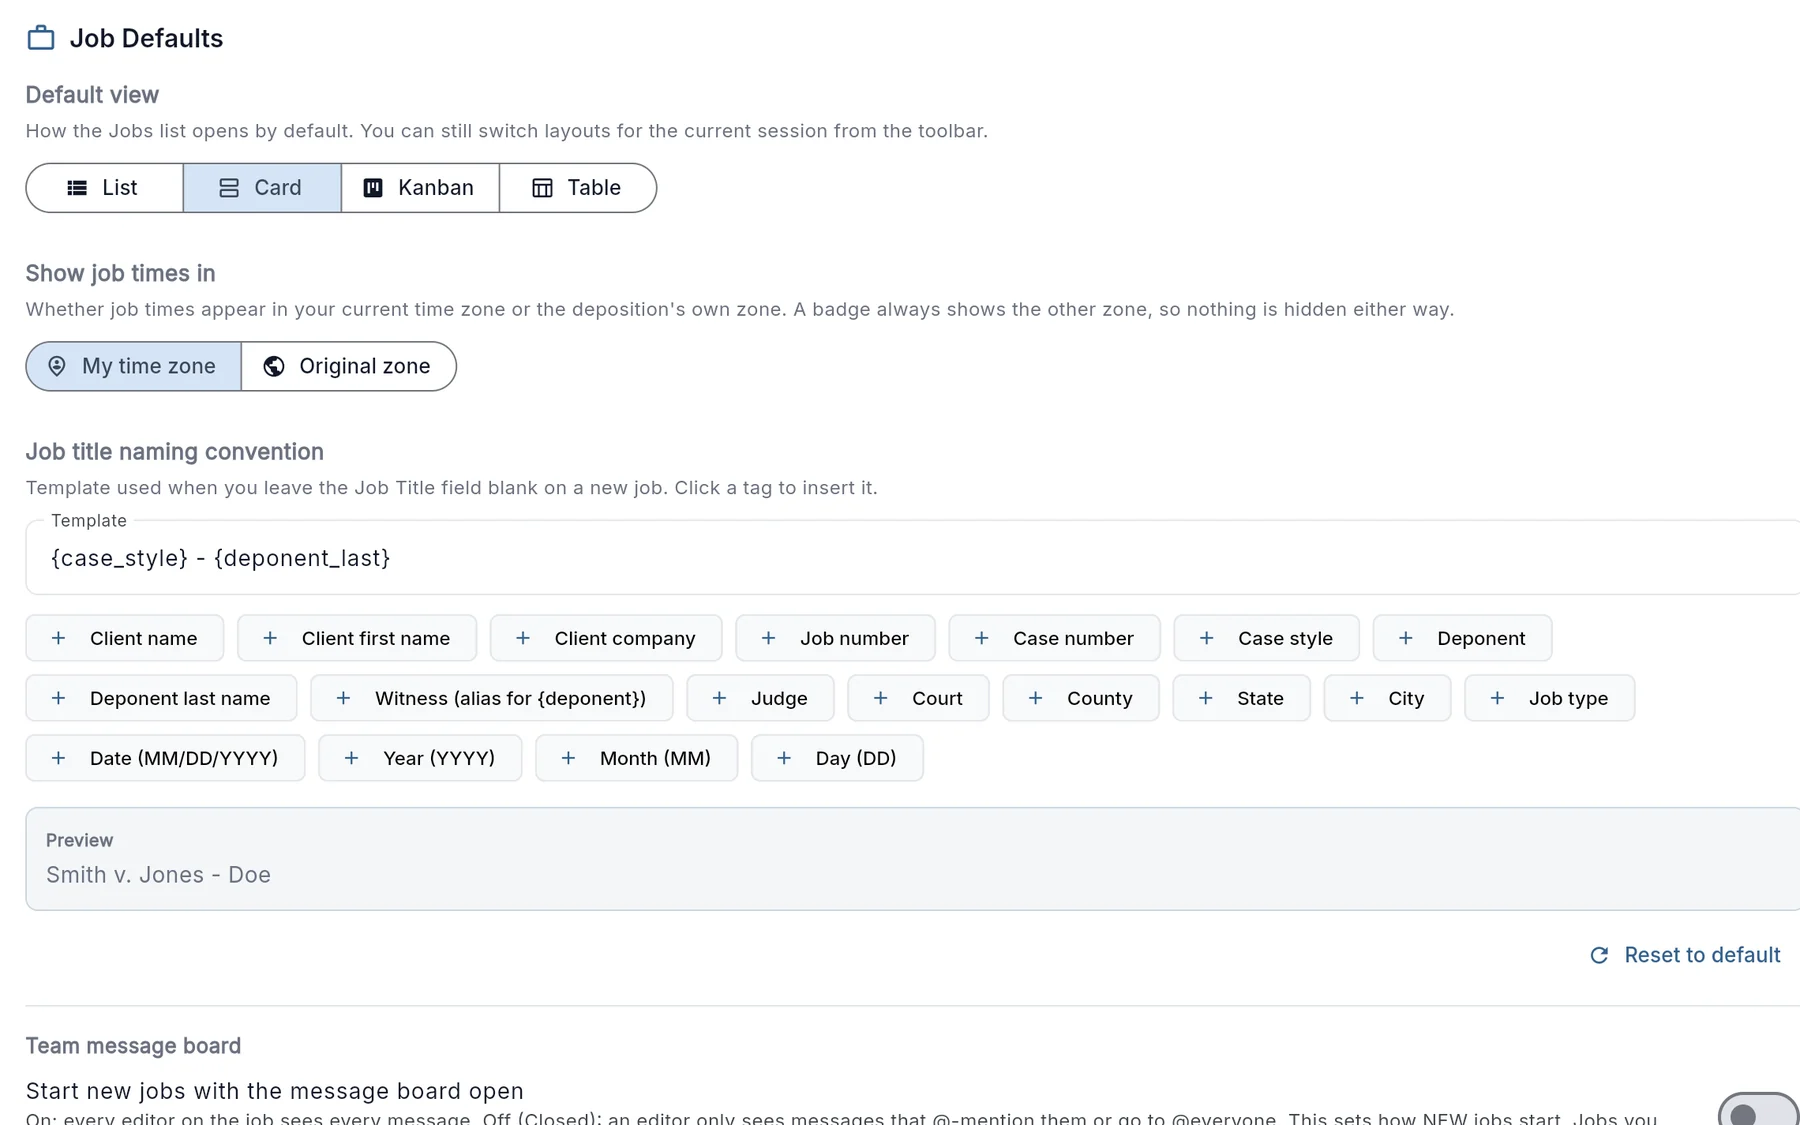
  2. Under Job title naming convention, click the tags to build your pattern, for example Case caption - Deponent last name or Client - Job number. The preview shows the result.
  3. Leave the Job Title field blank on a new job and this pattern names it. A title you type yourself always wins.
Settings, Jobs: job title naming convention with tags and a preview

The same tab sets your default jobs view, the file naming convention, and whether new jobs start with the message board open.

7

Create your first job

Two ways in: type it, or let StenoDesk read the notice for you.

By hand

  1. Open Jobs and press New Job.
  2. Pick the Client, then the Job Date and start time. The due date fills in from the client's turnaround.
  3. Add the case number, deponent and location.
  4. Leave Job Title blank and your naming convention titles it.
  5. Optional: add the cast of characters (attorneys, videographer, interpreter) now or later on the job.
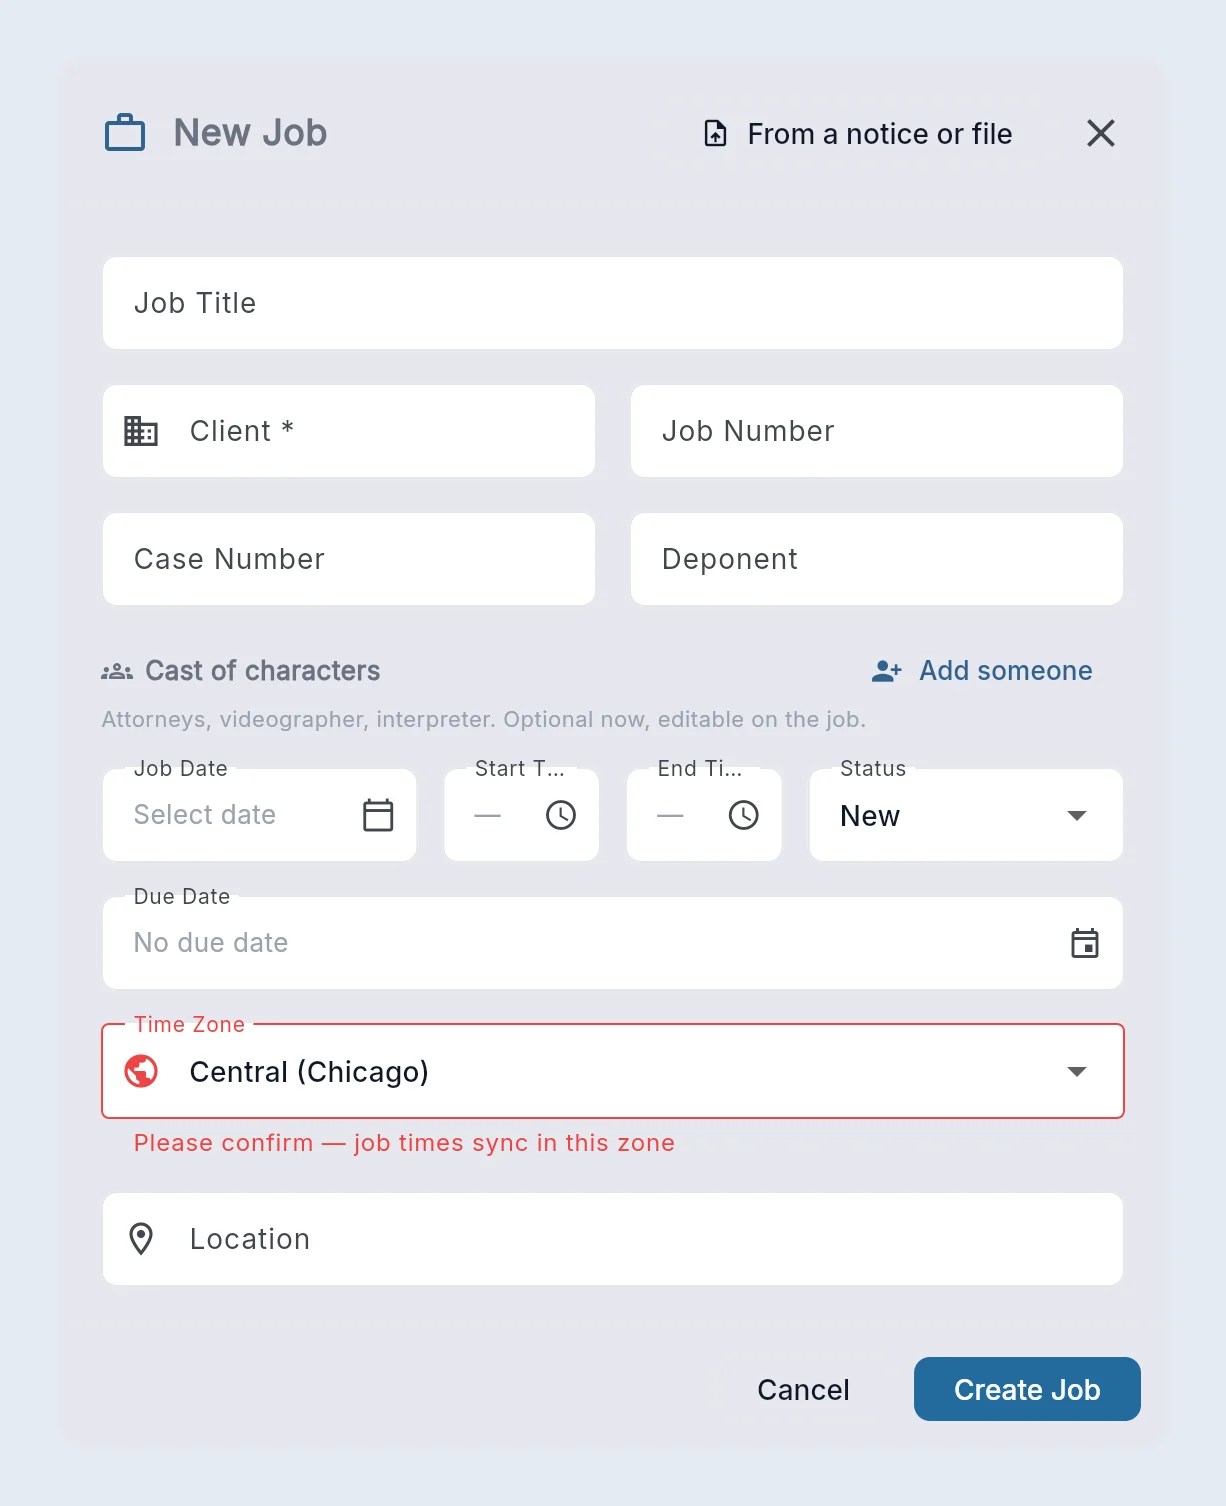
The New Job form

From an email or a notice

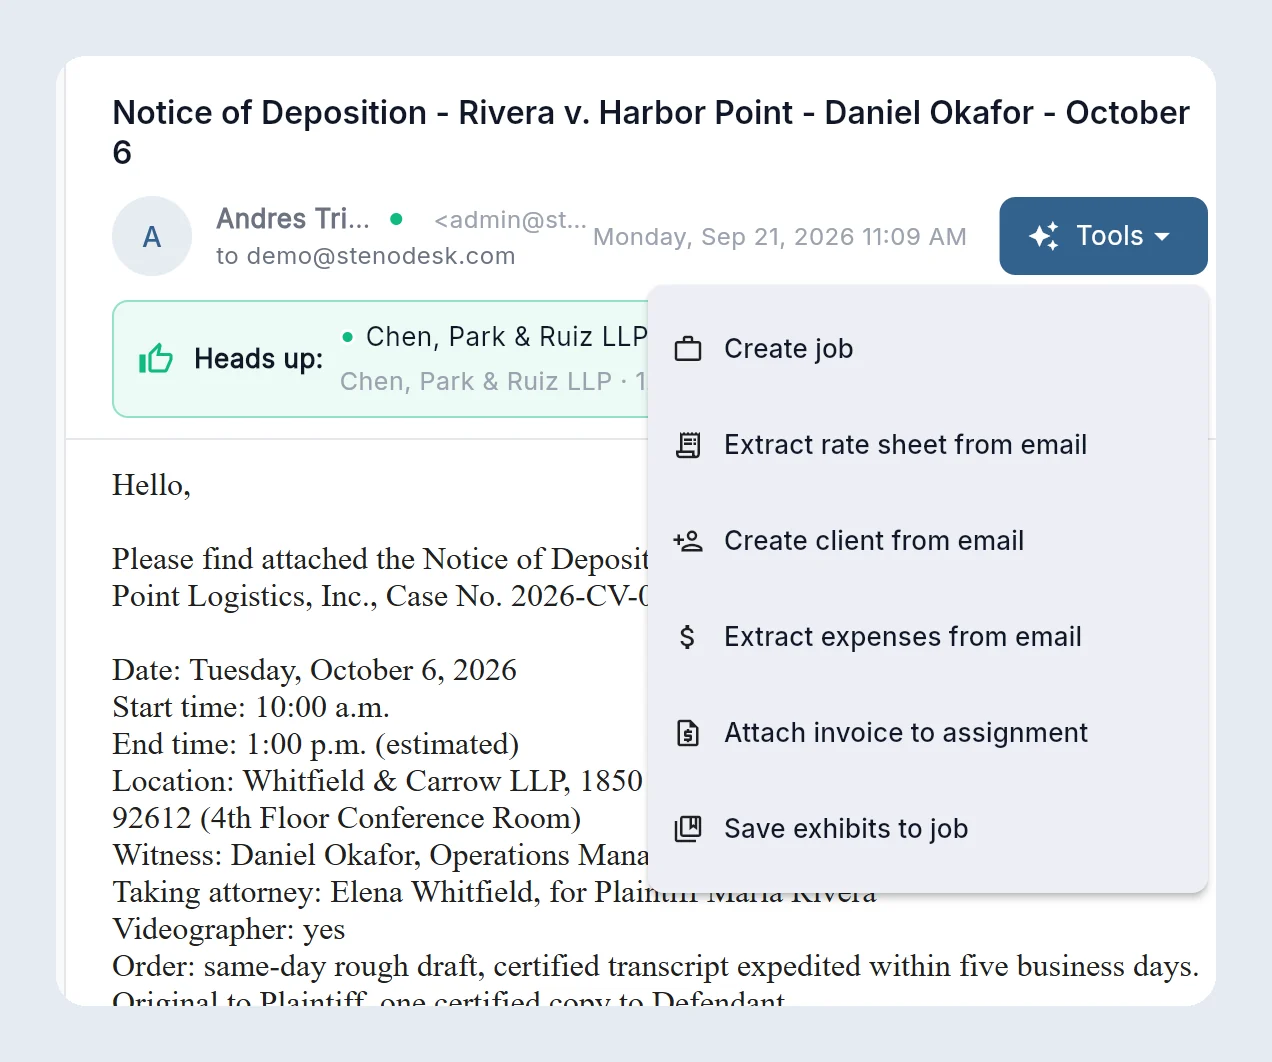
  1. Open the email with the job request or notice, press Tools, then Create job.
  2. Or, in New Job, press From a notice or file and pick the notice of deposition (PDF or photo).
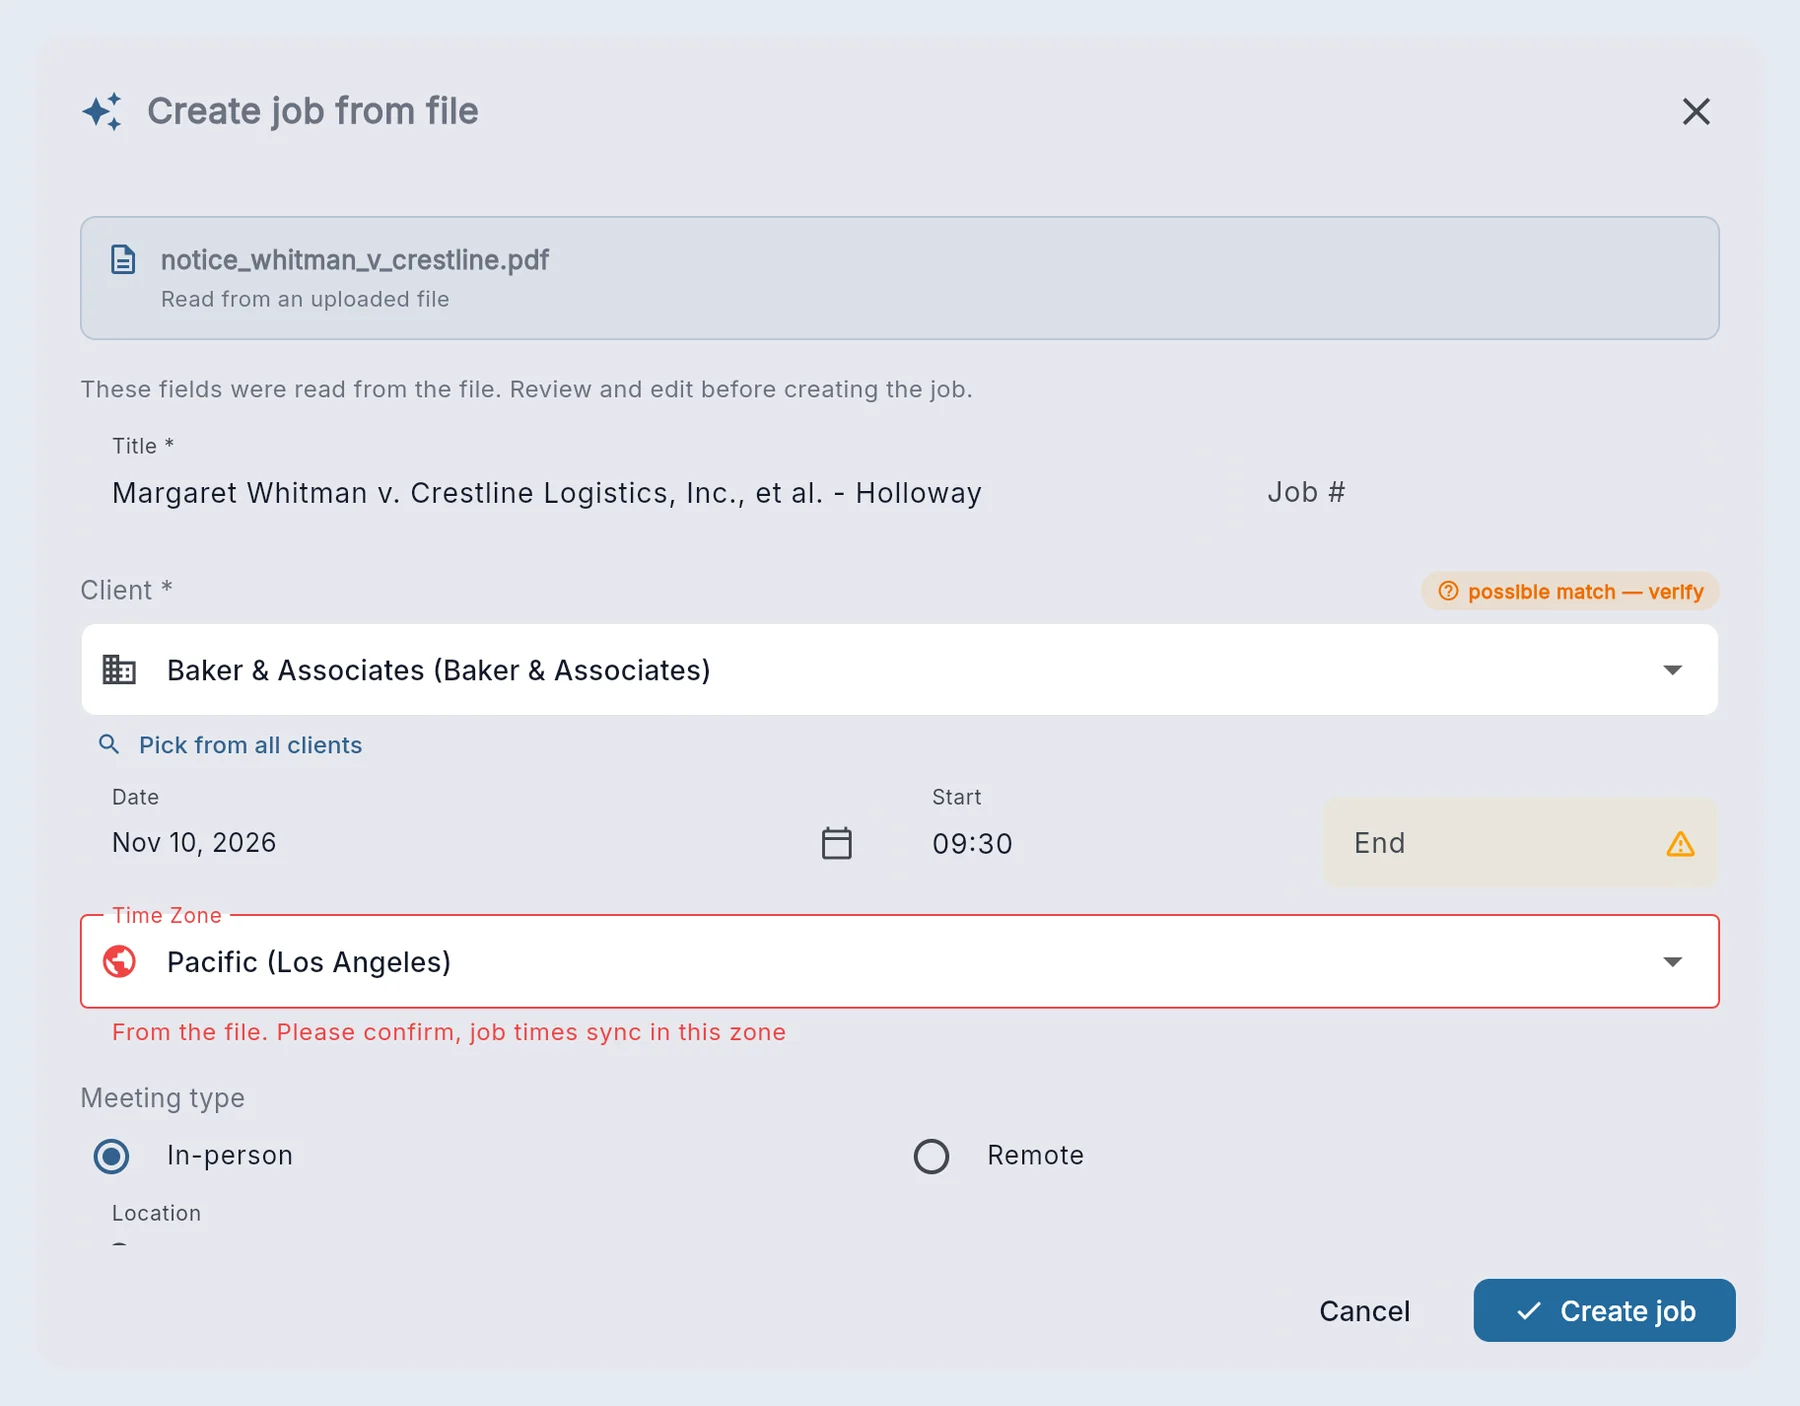
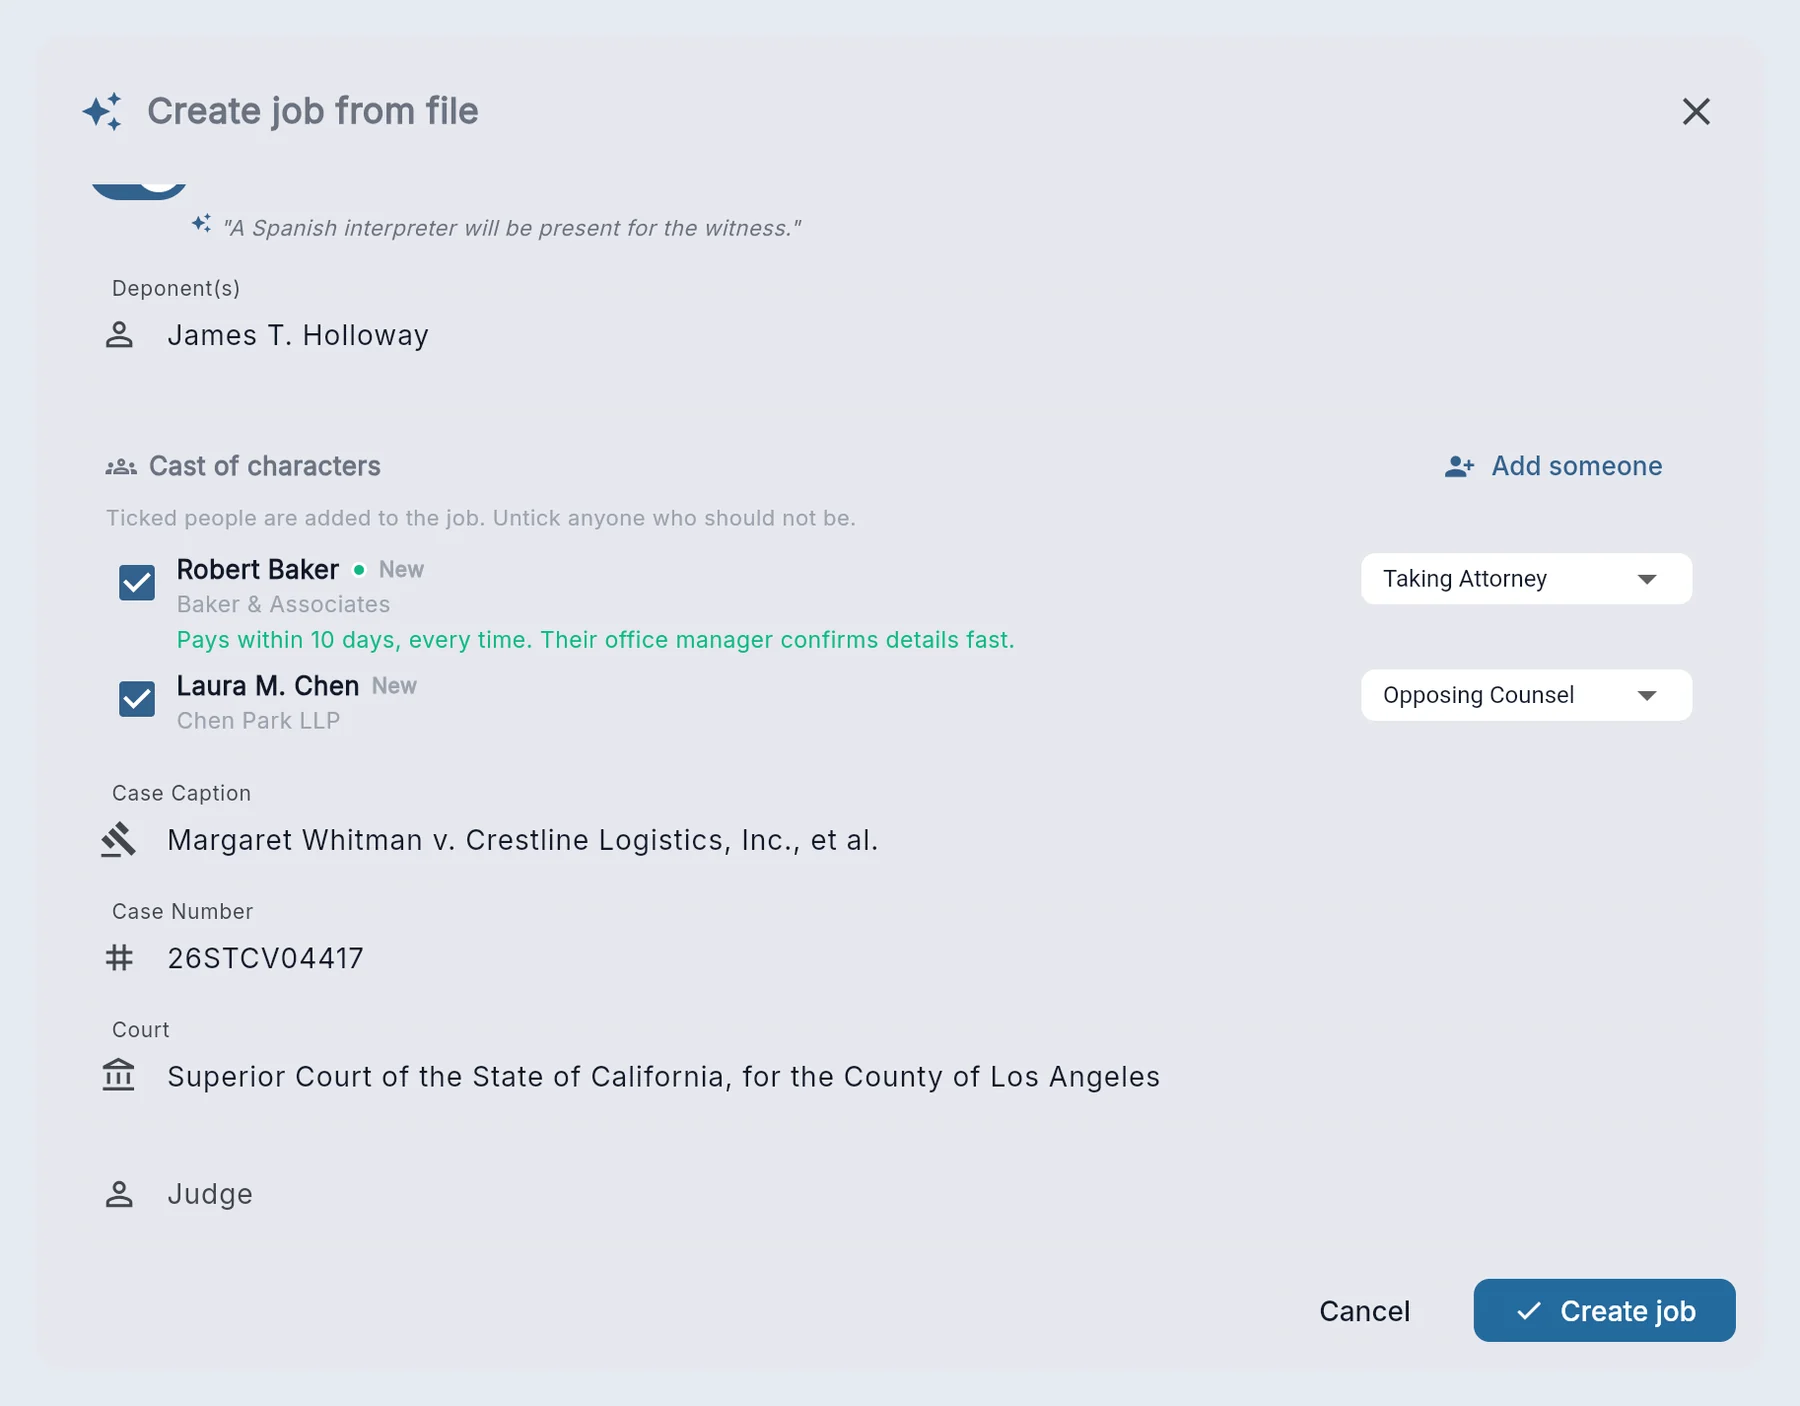
  3. StenoDesk reads it and opens a review window with everything filled in, shown below. Check it, then press Create job.
An open email with the Tools menu showing Create job
Review window: title, client, date, start time and time zone read from the notice
Review window: deponent, cast of characters with roles, case caption, case number and court
The review window, top and bottom. Client, date and time, time zone and location are read for you, and a yellow note marks anything worth a second look. Further down: the deponent, the attorneys as the cast of characters with their roles, and the case details. Add-ons like video and an interpreter are switched on with the sentence they came from. The notice is filed in the job's Job Files.
8

Find your way around a job

Files, the workflow and your team, all on one page.

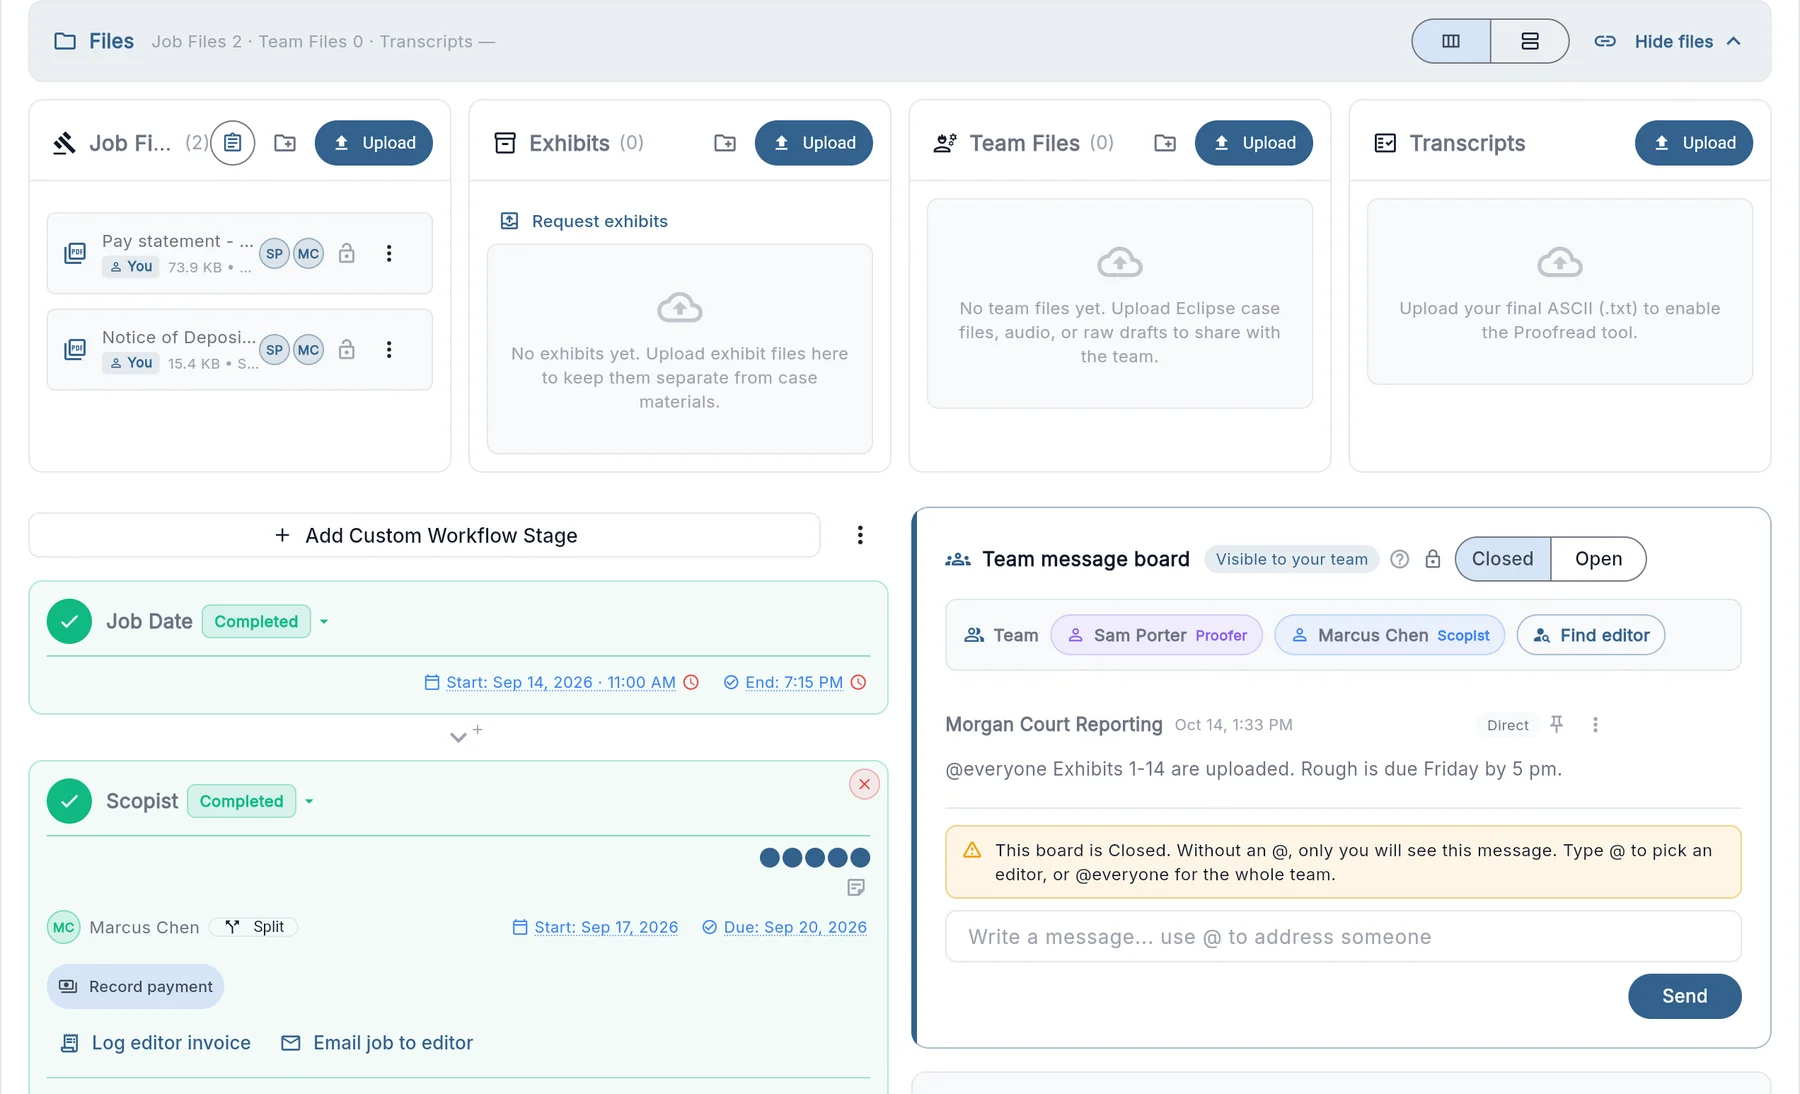
  • Files, side by side: Job Files (the notice and anything from the client), Exhibits, Team Files (case files, audio and drafts for your editors) and Transcripts. The toggle above them switches between side by side and stacked.
  • Workflow: the job moves through stages (job date, scopist, review, proofreader, final review). Assign an editor to a stage and press Next to hand it on.
  • Team message board: talk to your editors on the job. Closed (the default) means editors only see messages addressed to them or to @everyone; Open shares everything with the team. Notes & Updates below it stay private to you.
Job page: four file buckets side by side, the workflow stages and the team message board

Choose who sees each file

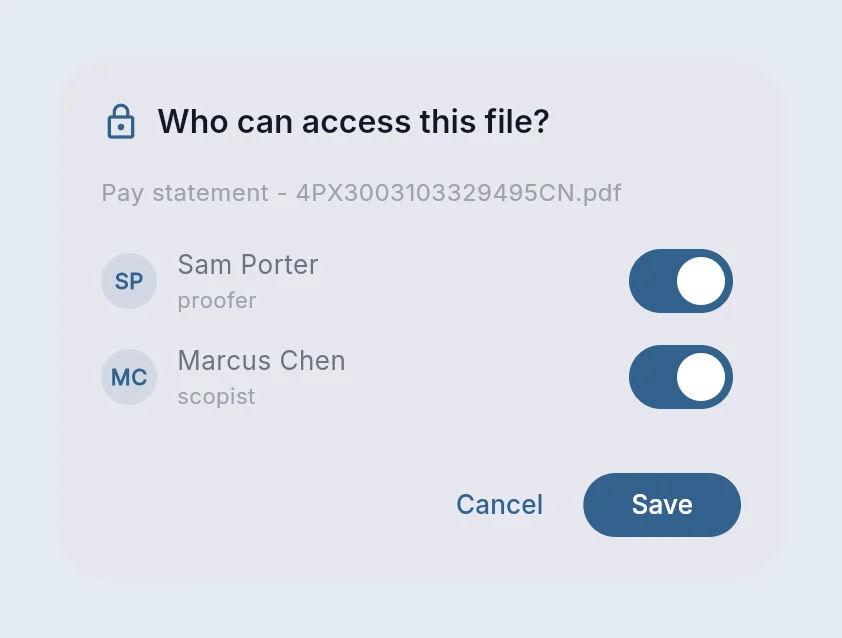
Press the lock on any file and switch each editor on or off. Quicker still, tap an editor's initials on the file row to grant or remove their access. Editors only see what you share with them.

The default for new files is under Settings, Jobs: share with the job's editors, or keep private until you say so.

Who can access this file: a switch per editor
9

Bill as you go

Record what the job needs as you learn it. The total keeps up with you.

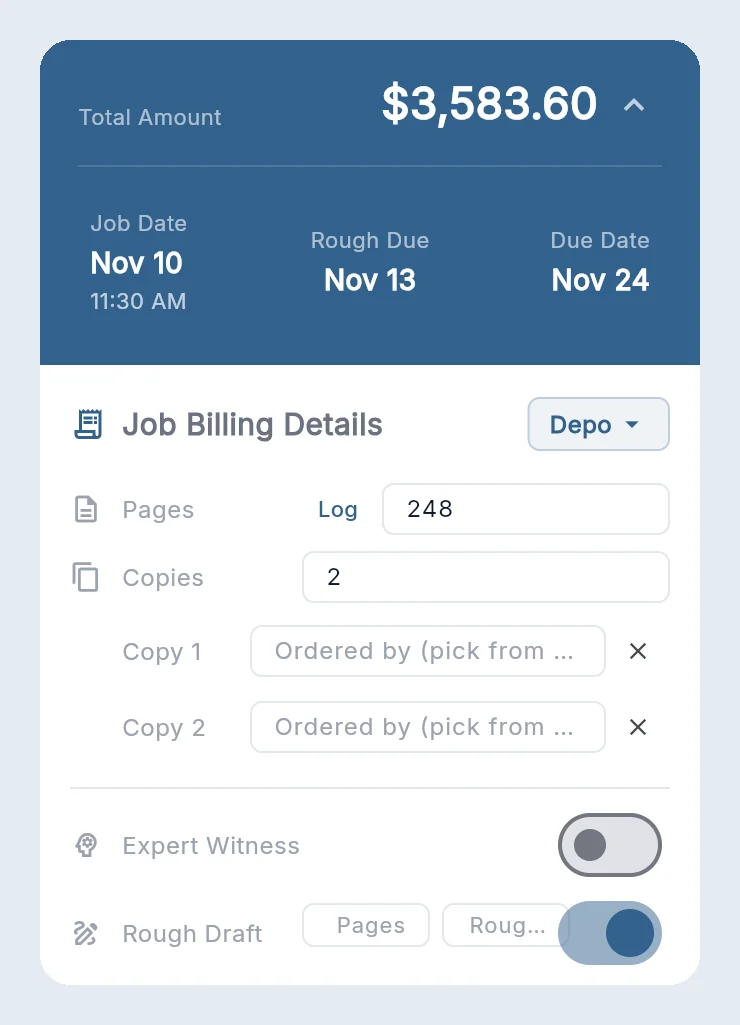
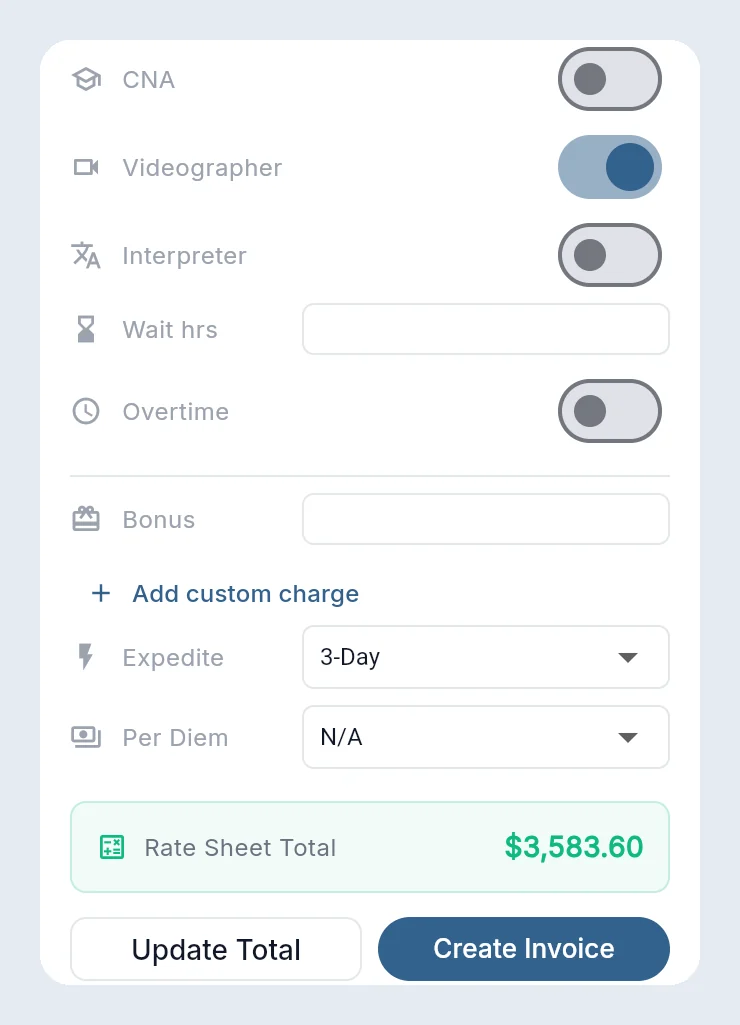
The Job Billing Details card sits on the right of every job. Fill it in as the job unfolds: pages and copies (with who ordered each copy), switches for expert witness, rough draft, CNA, videographer and interpreter, then wait hours, overtime, a bonus or custom charge, the expedite level and per diem.

Every change saves on its own, and the Rate Sheet Total recalculates from the client's rates as you go. When the job is done, Create Invoice turns all of it into an invoice (step 10).

Job Billing Details, top half: total, dates, pages, copies, expert witness and rough draft
Job Billing Details, bottom half: CNA, videographer, interpreter, wait hours, overtime, bonus, expedite, per diem, the rate sheet total and Create Invoice

Roughs get a reminder

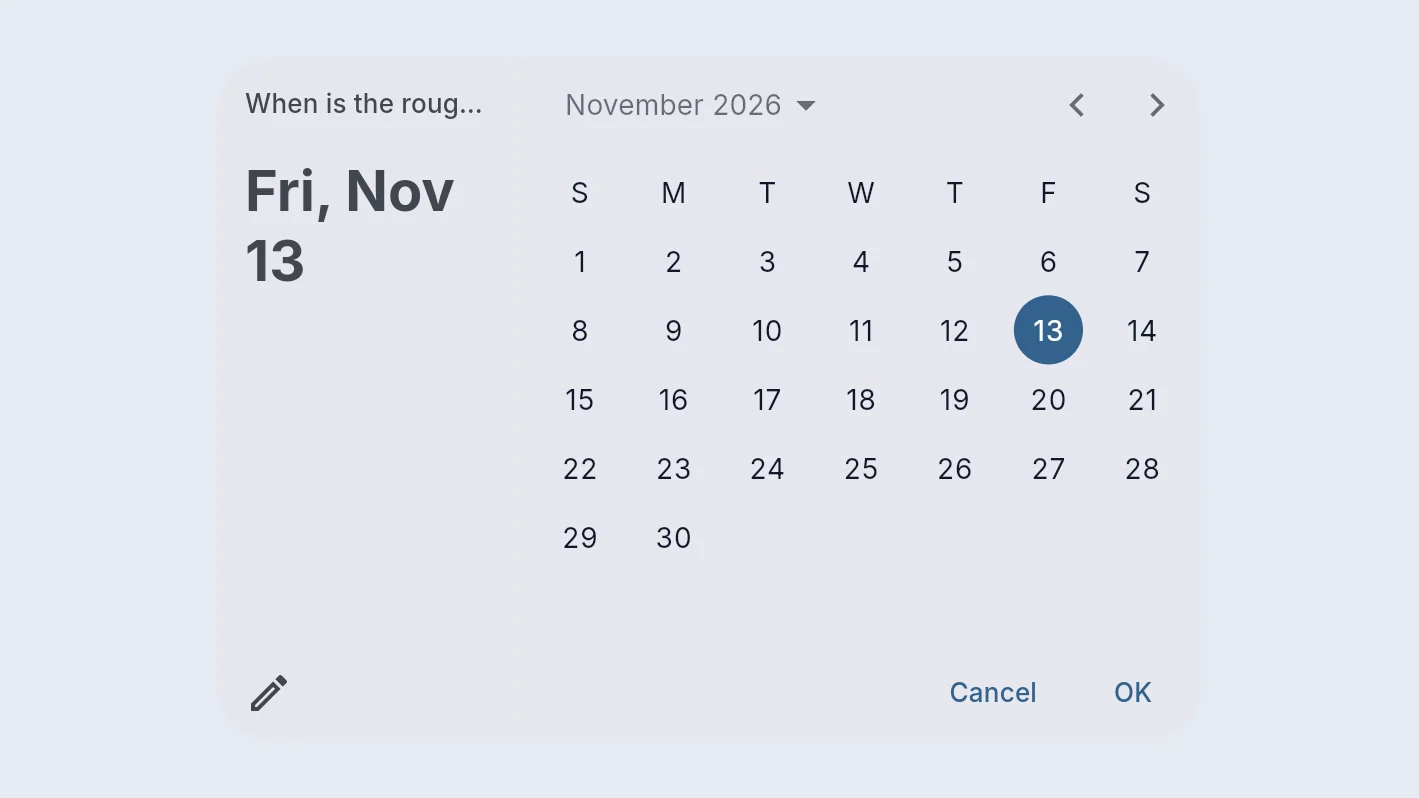
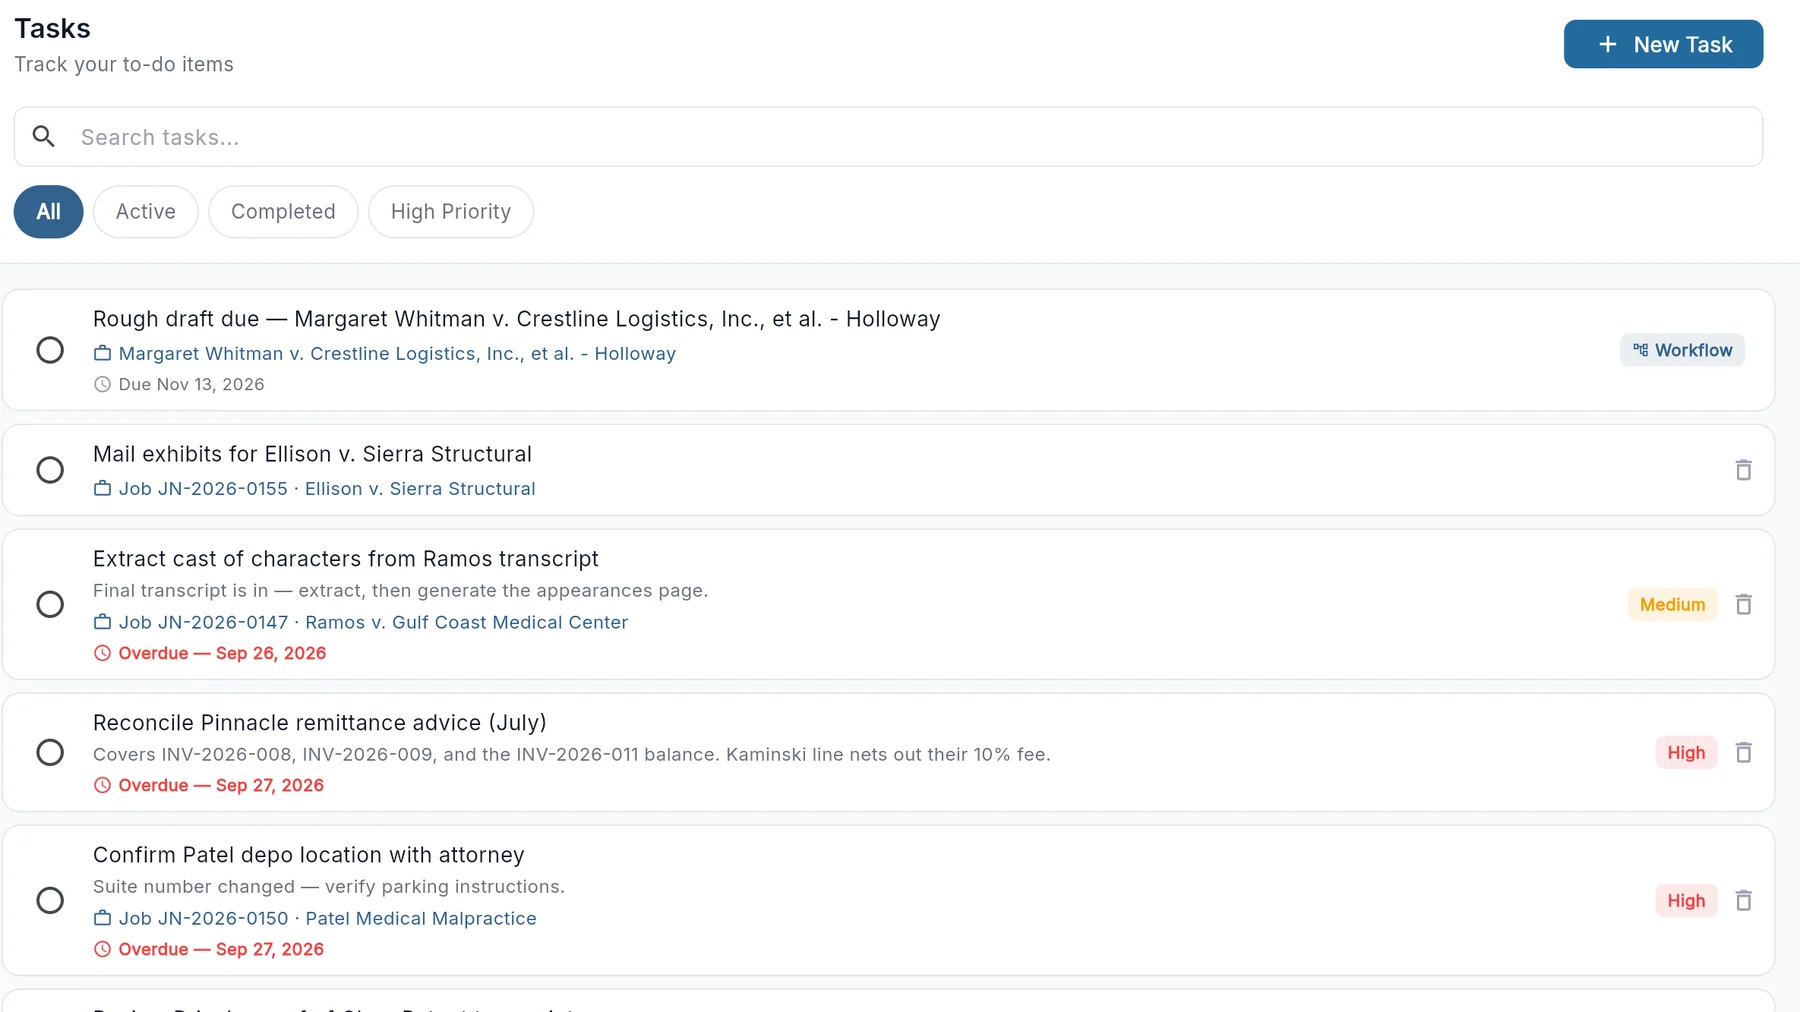
Switch on Rough Draft and StenoDesk asks when it is due, then adds a task for it, linked to the job, so it is not forgotten.

Turning on Rough Draft asks when the rough is due
Tasks: the rough draft due task added automatically
10

Invoice and get paid

The invoice writes itself from the job and the rate sheet.

  1. In Job Billing Details, press Create Invoice.
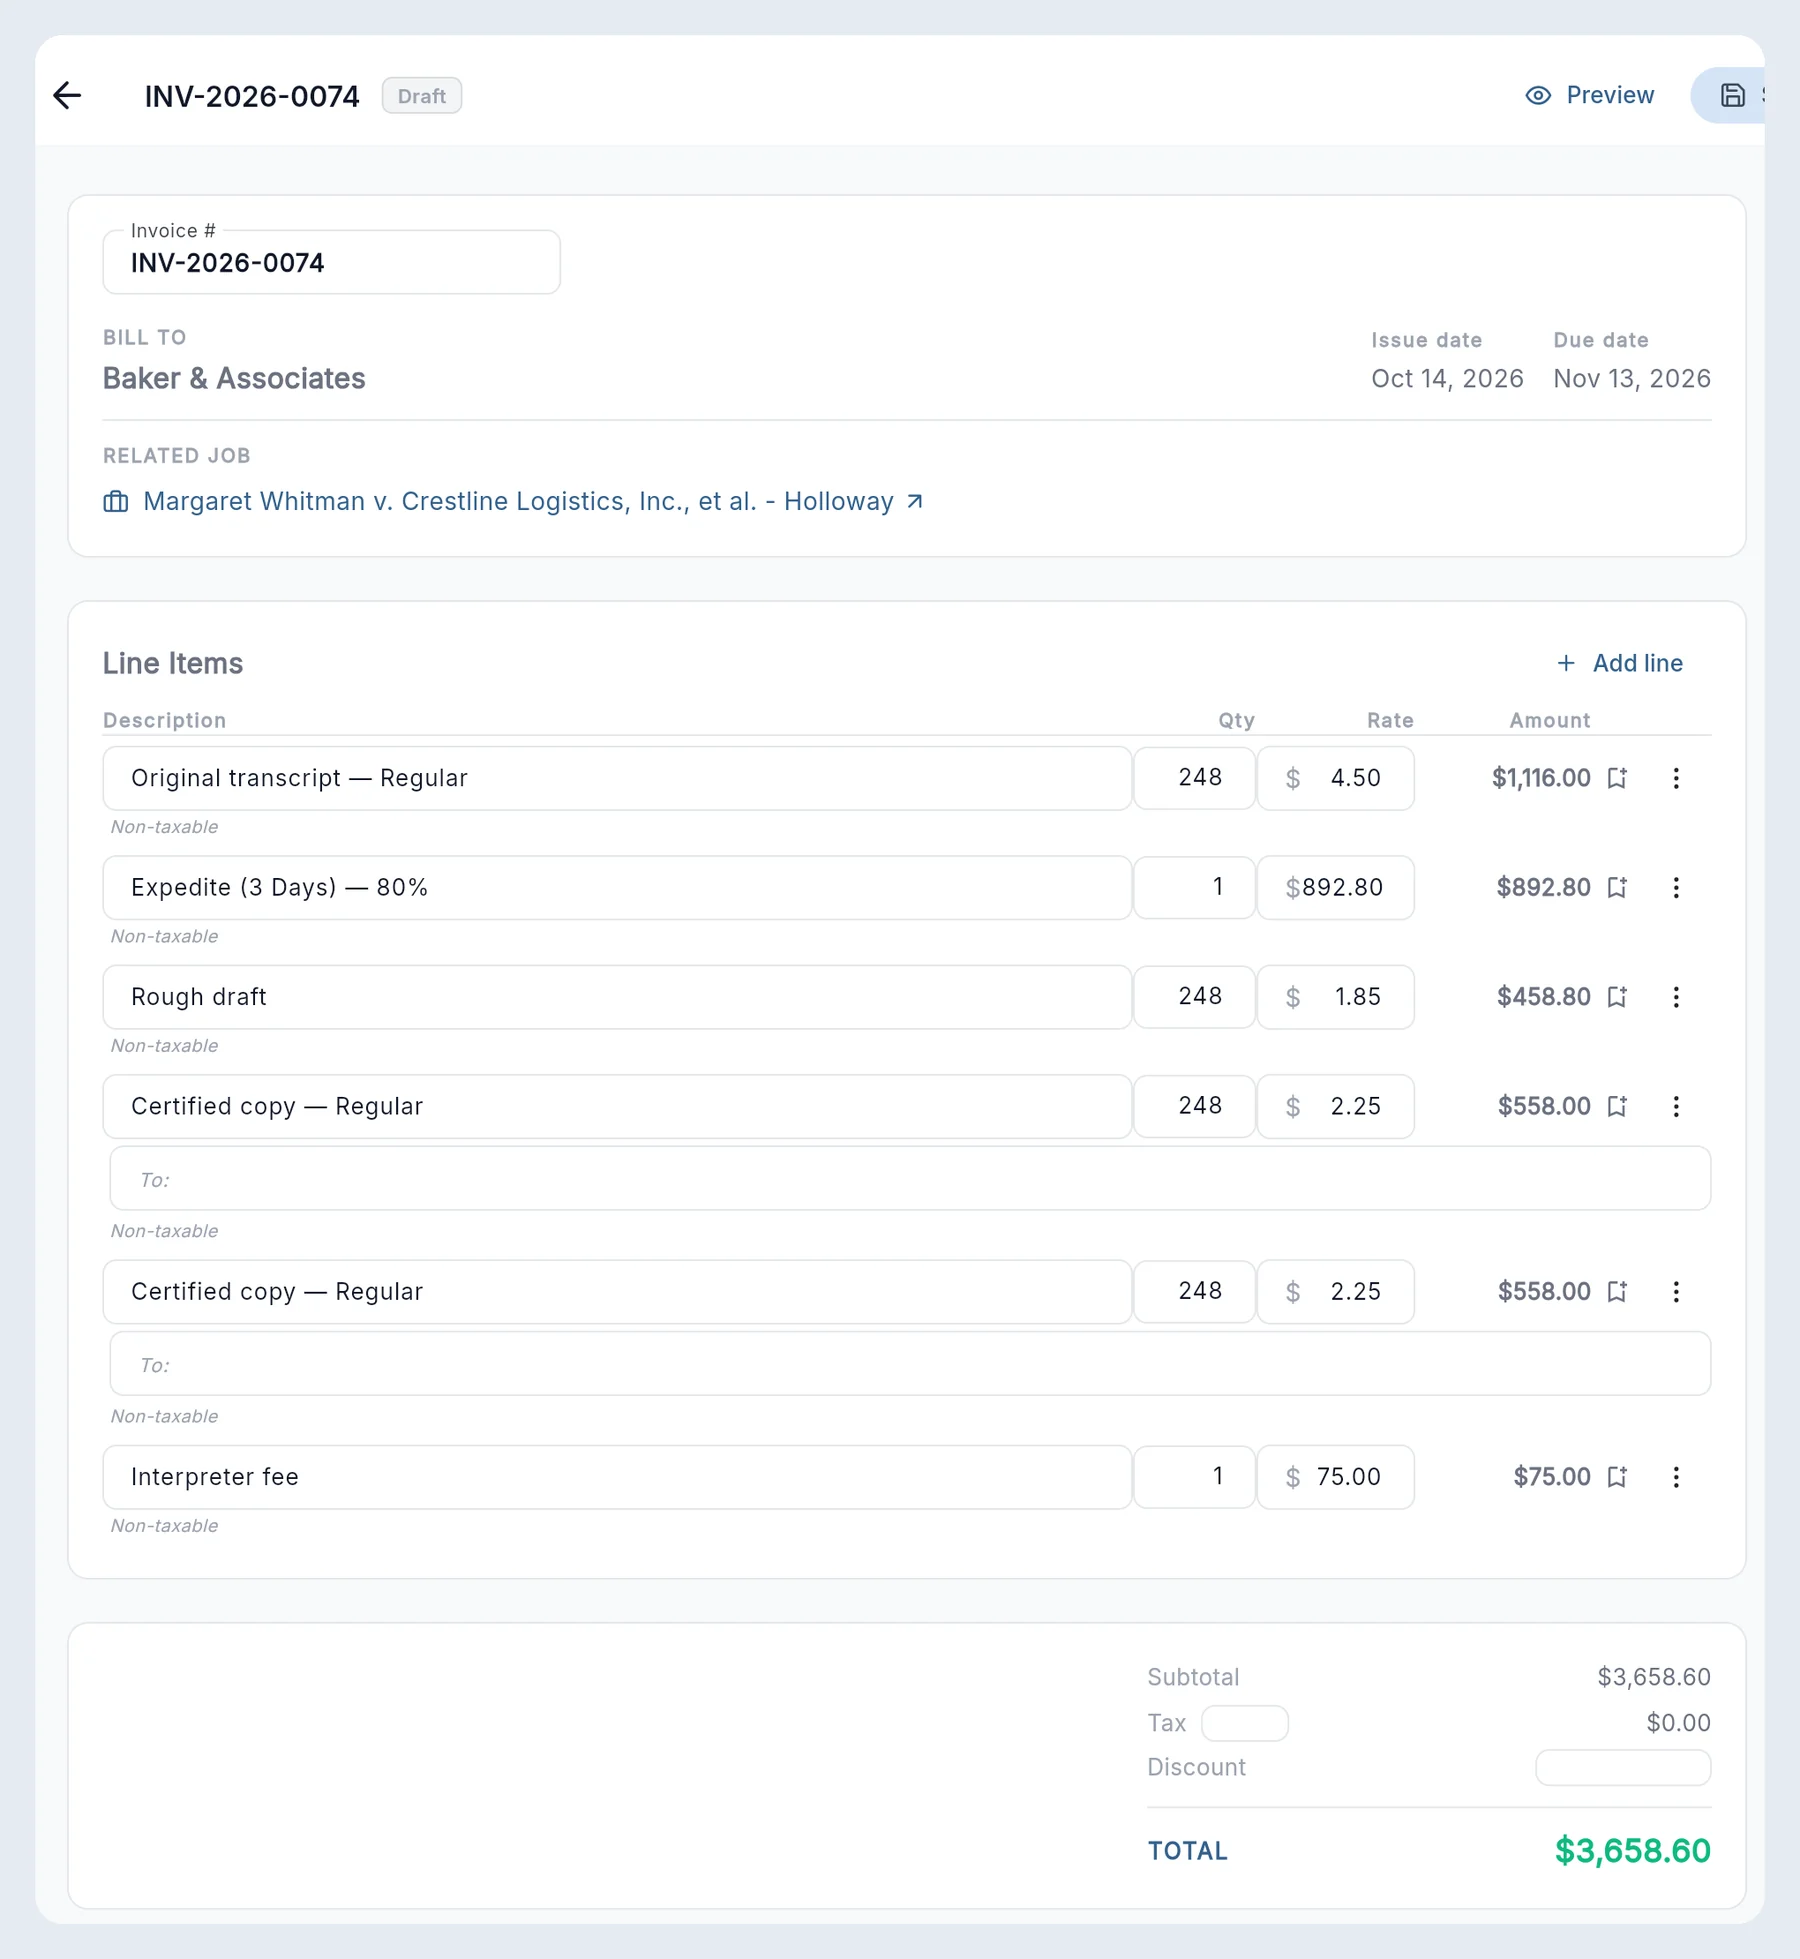
  2. StenoDesk builds every line from the job and the client's rate sheet: the transcript, the expedite, the rough, each copy and any fees. Nothing to retype.
  3. Press Open invoice to check it. Add a line or a note if you need to; the totals update.
  4. Preview shows the PDF with your logo and terms from step 2. Send Invoice emails it to the client.
  5. When the client pays, press Record Payment. Unpaid and overdue invoices stay flagged under Finances.
An invoice with six lines built automatically: original transcript, 3-day expedite, rough draft, two certified copies and an interpreter fee, with the total
11

Add your editors

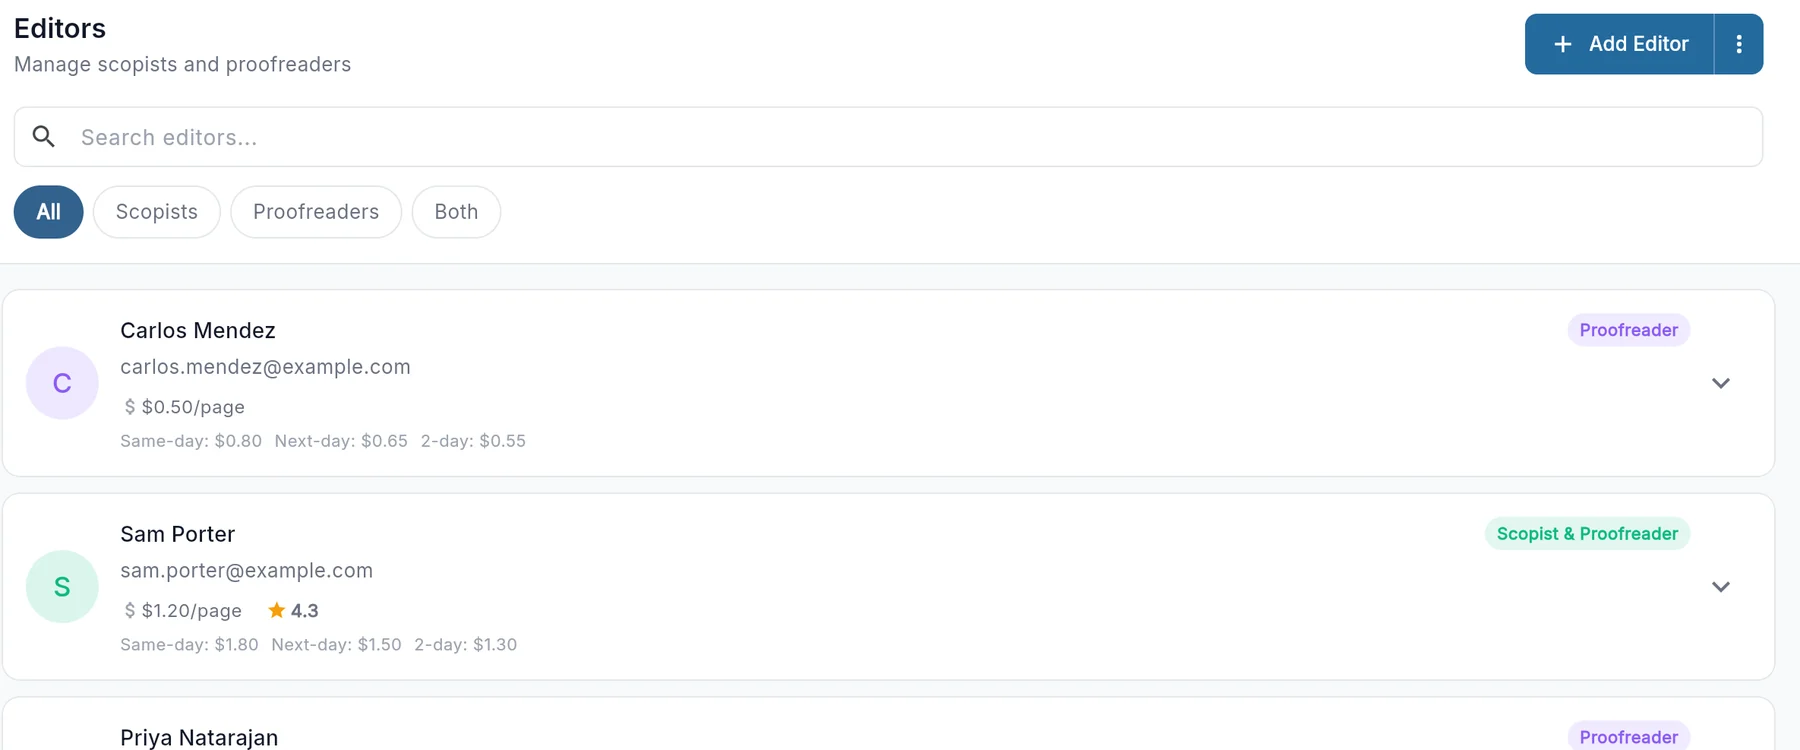
Your scopists and proofreaders. Editors use StenoDesk for free.

The Editors page listing scopists and proofreaders with their rates
  1. Open Editors and press Add Editor.
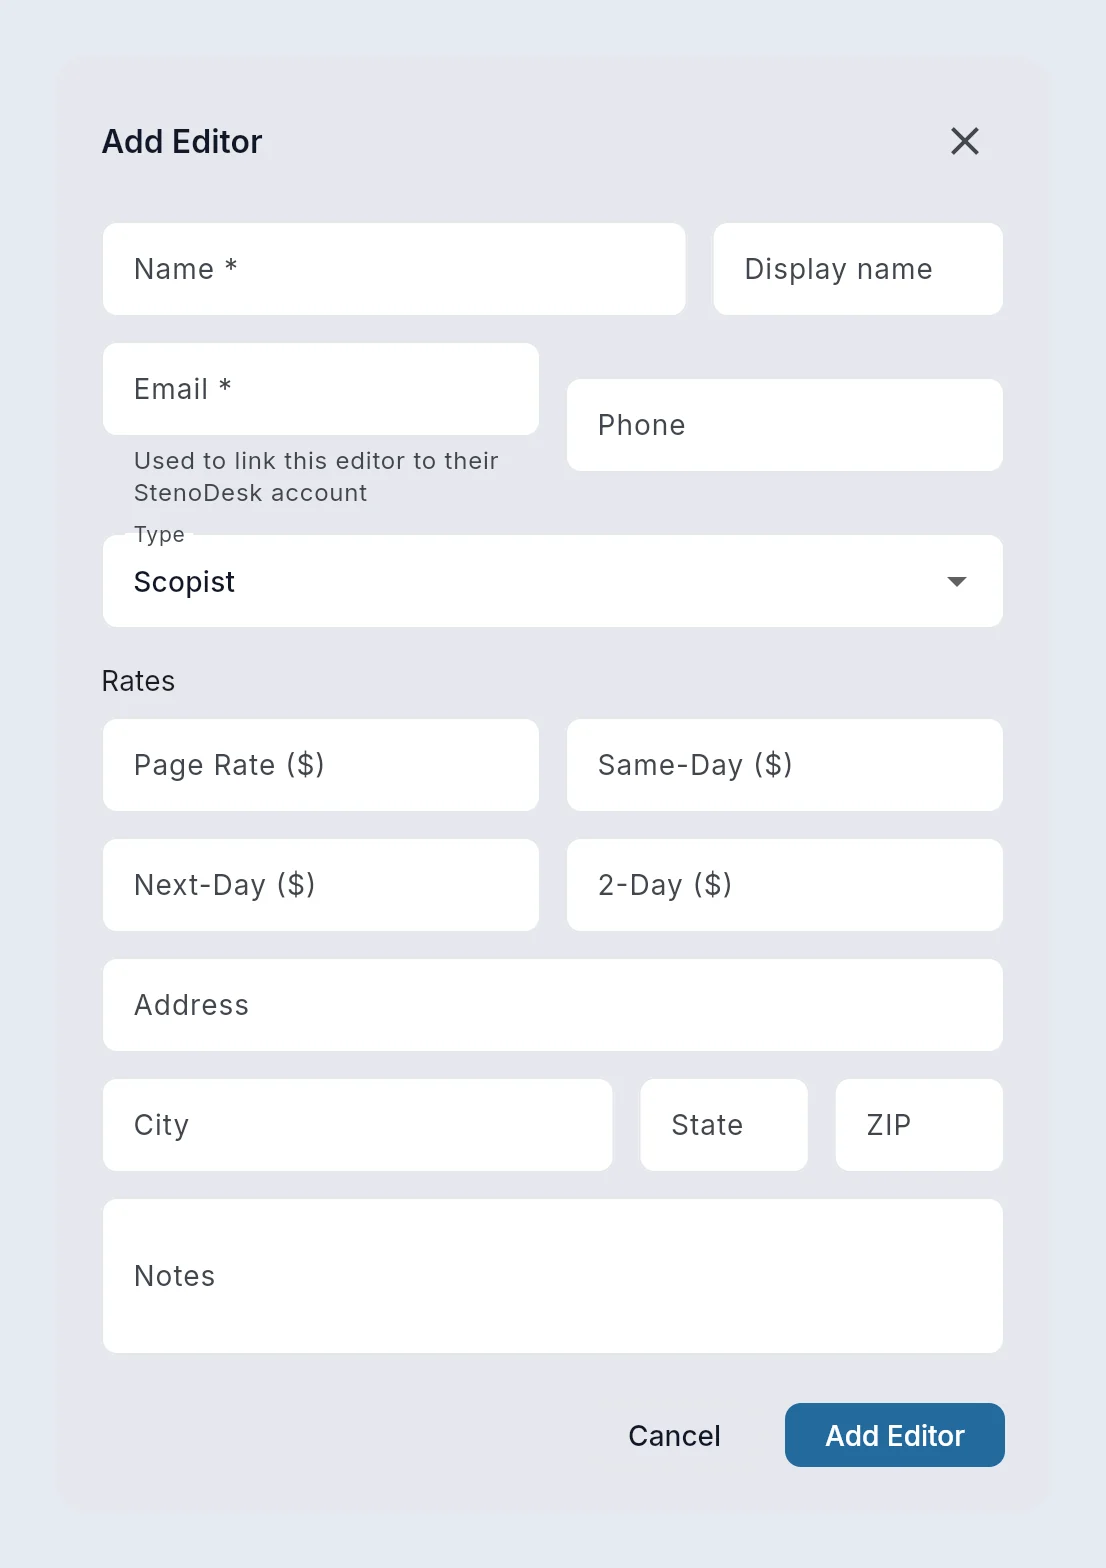
  2. Enter their name and email, whether they scope, proof or both, and their rates (page, same-day, next-day, 2-day).
  3. On a job, assign them to the scoping or proofing stage of the workflow.
  4. They get the job in their own StenoDesk, with the files you share and the message board. You see their progress on the job.
The Add Editor form
12

Sync your calendar

Jobs, due dates and tasks on the calendar you already check on your phone.

  1. Calendar sync uses your email connection from step 3, so there is nothing new to sign in to.
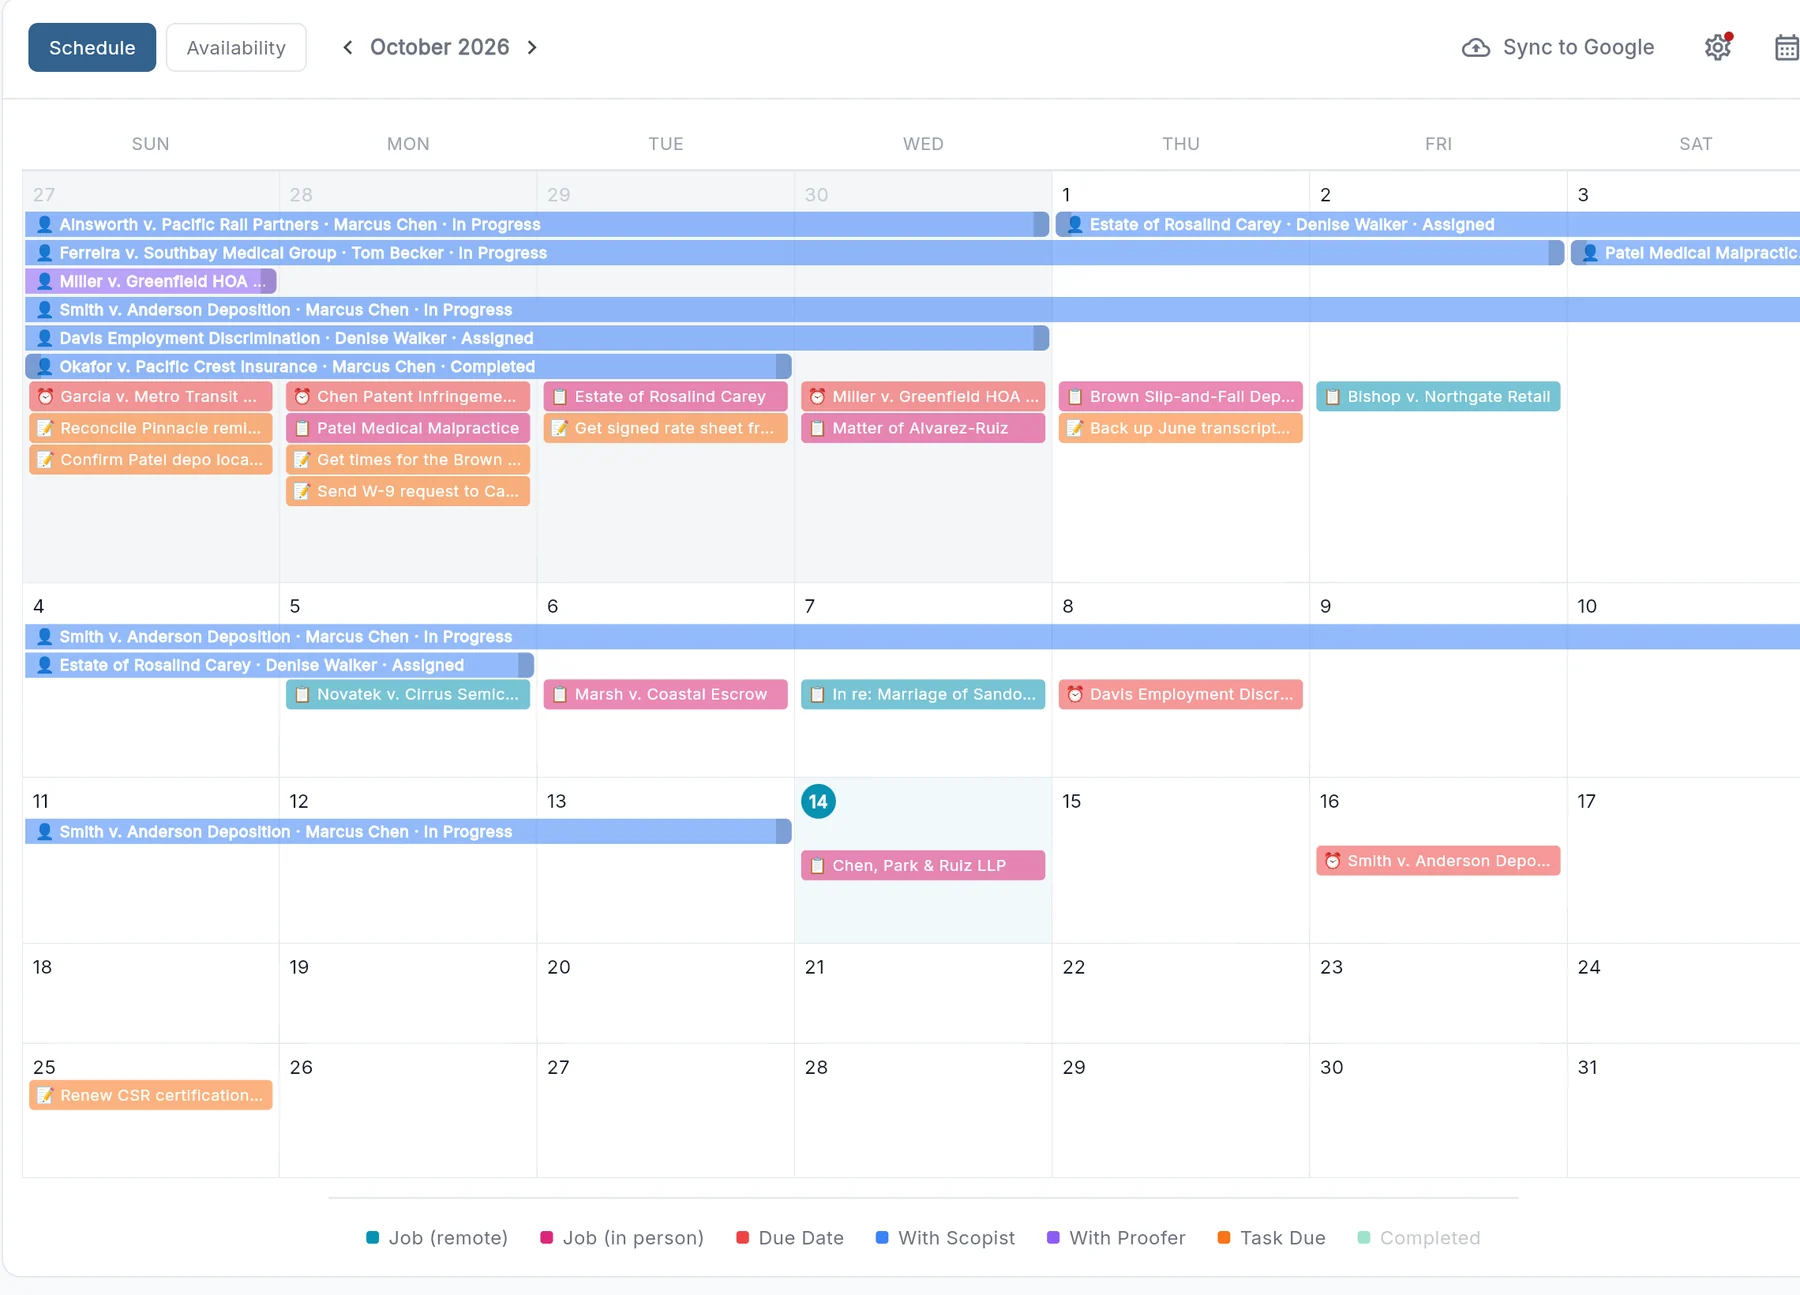
  2. Open Calendar. It already shows jobs, due dates, editor deadlines and tasks.
  3. Press the gear button at the top and choose how StenoDesk should appear in your Google or Outlook calendar. StenoDesk creates the calendars for you; your own calendars are never touched.
  4. From then on, new and changed jobs appear there on their own. Move a job in your calendar app and StenoDesk picks up the new date.

One, five or six calendars?

  • One calendar. A single "StenoDesk" calendar holds everything. Pick this if you just want your work to show up and you do not mind every entry sharing one color.
  • Five color-matched calendars. SD Jobs, SD Due, SD Tasks, SD Scopist and SD Proofer, each in the same color the StenoDesk calendar uses. Pick this if you like to read your week by color, or you want to hide a layer, for example switching off editor deadlines on your phone but keeping jobs and due dates.
  • Six calendars. The same five, with jobs split into SD In Person and SD Remote. Pick this if you do a mix of both and want to tell travel days from desk days at a glance.

You can also choose a start date, so only jobs from that day forward are copied over. Changing your mind later is fine: turn sync off and set it up again with a different choice.

The StenoDesk calendar with jobs, editor stages and due dates for the month
13

See all your jobs your way

Four views of the same jobs. StenoDesk remembers the one you used last.

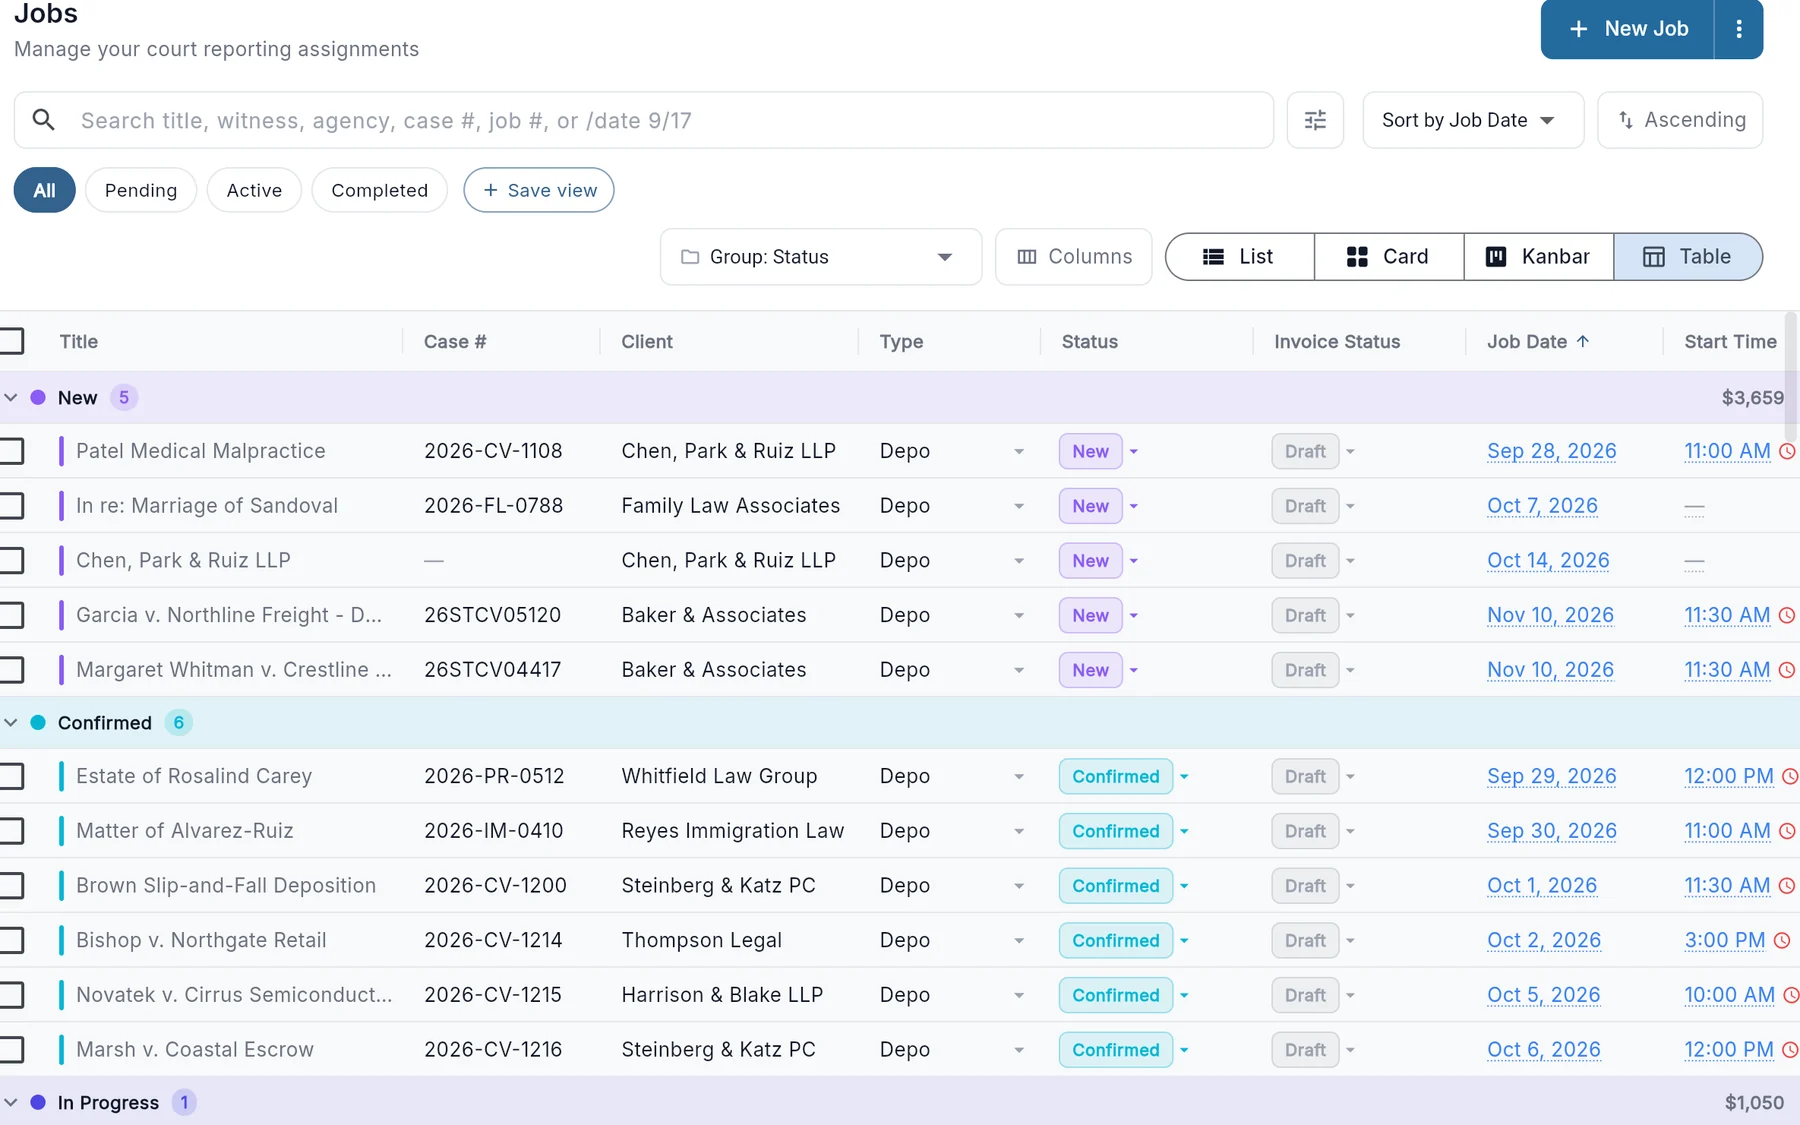
  • Table: every job in rows with sortable columns. Choose columns with Columns, sort by any date, and group by status, client or invoice status. Shown here grouped by status and sorted by job date, with a total per group.
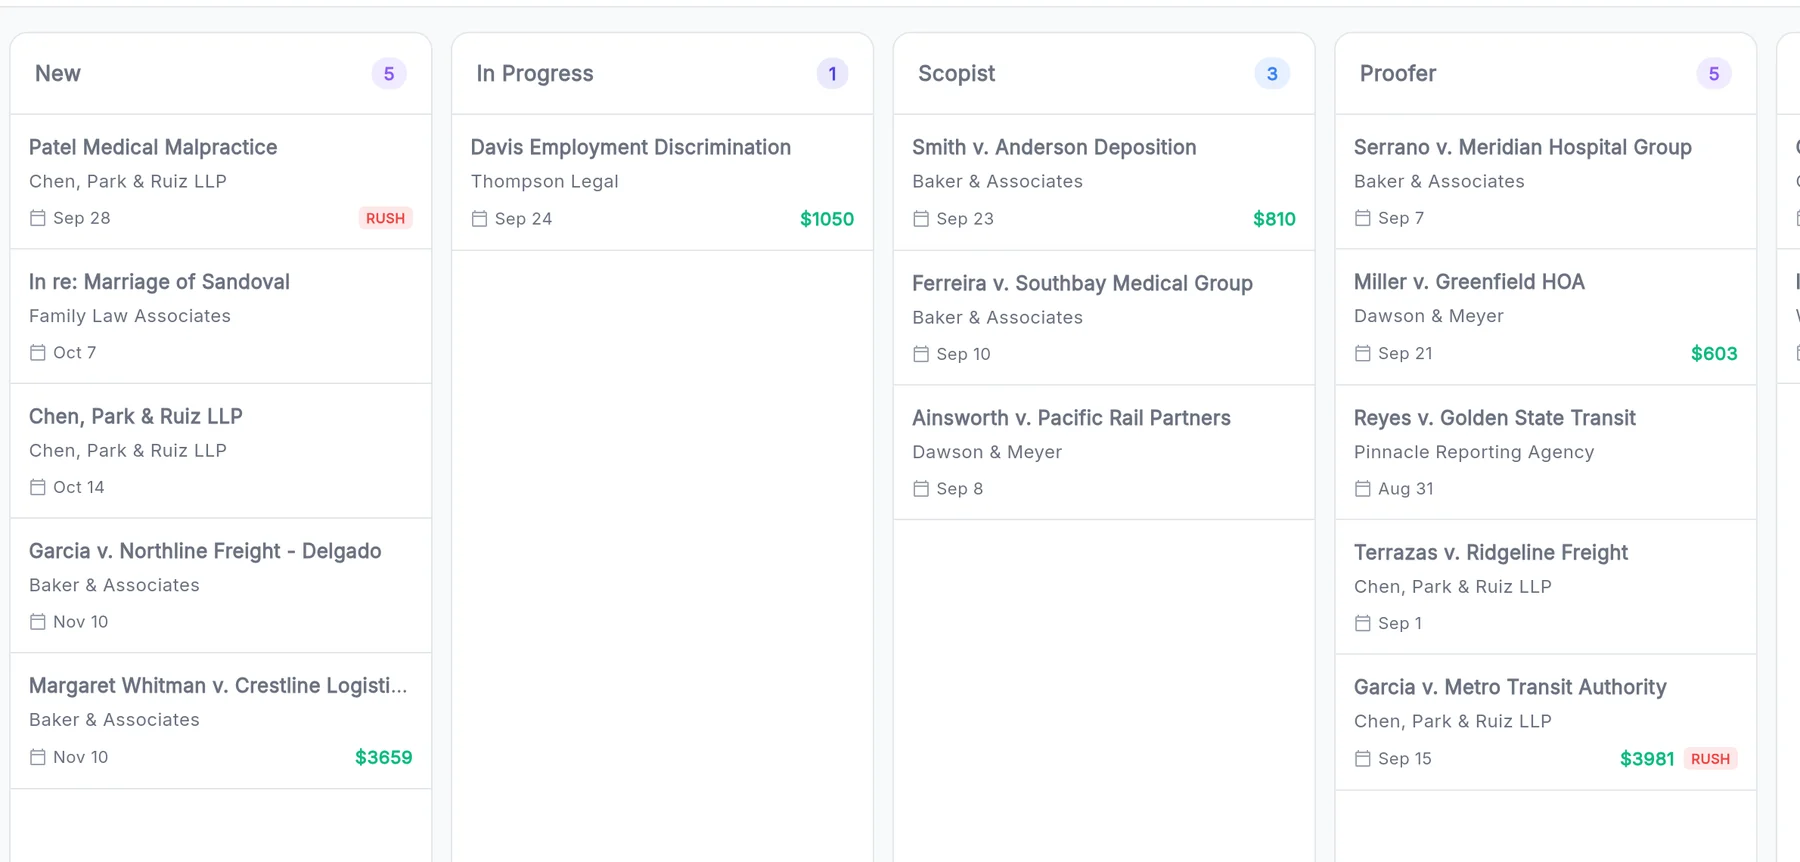
  • Kanban: a board with a column per stage, from New through scopist, proofer and complete.
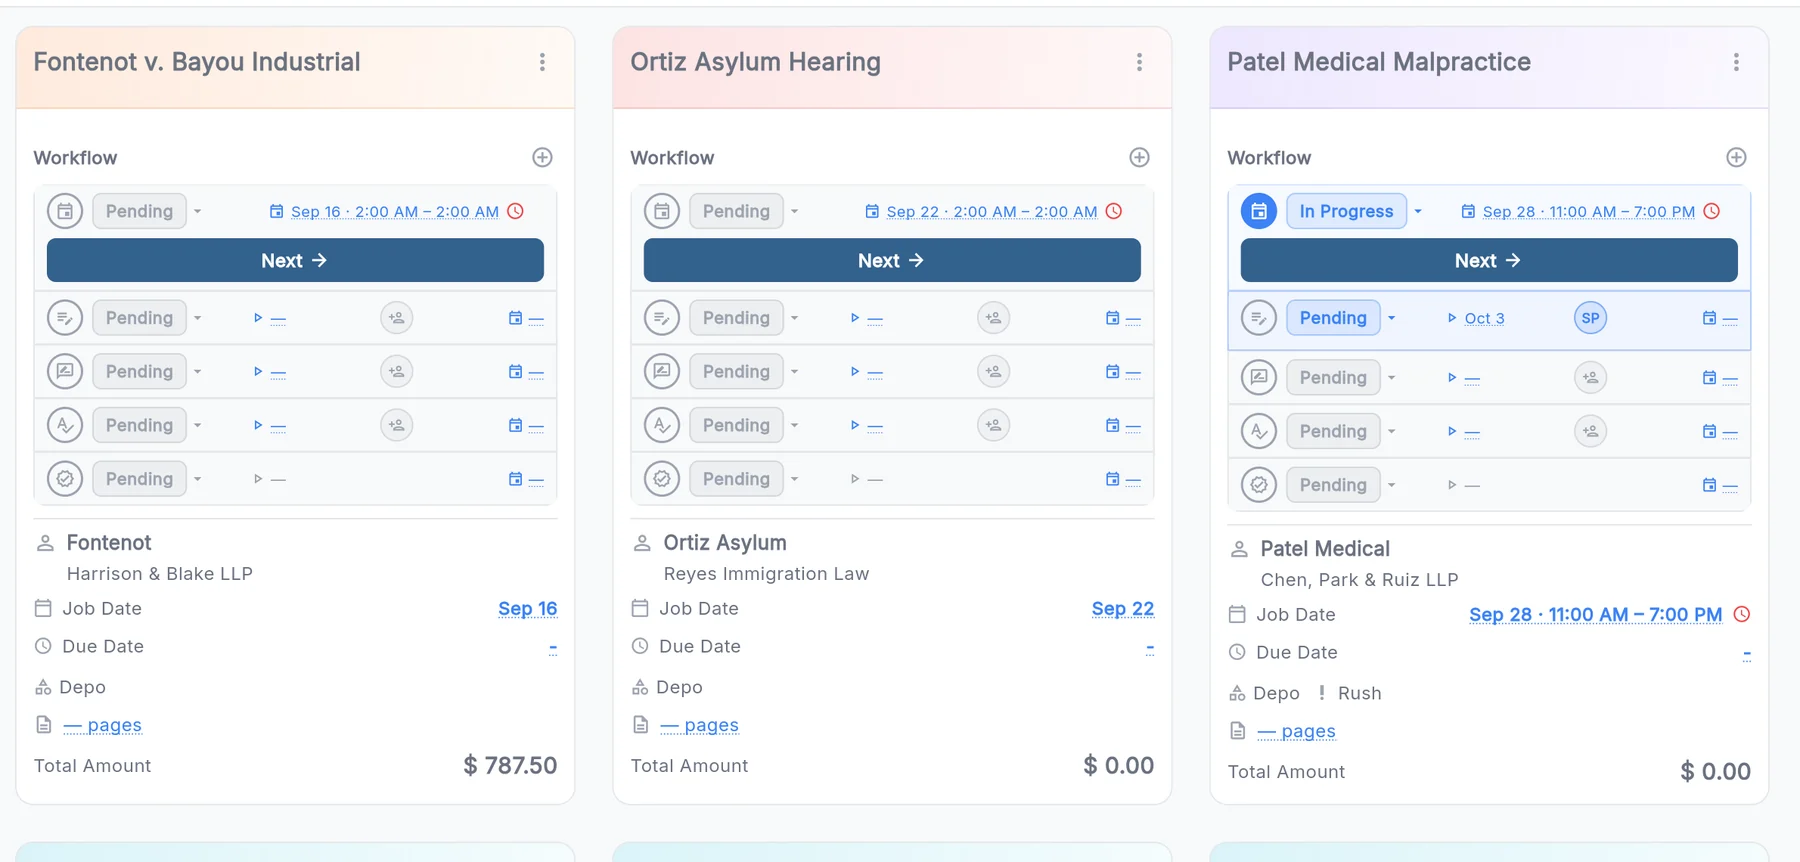
  • Card: each job with its workflow at a glance and a Next button.
  • List: a compact list, and the view phones use.
Jobs in Table view, grouped by status and sorted by job date
Jobs in Kanban view
Jobs in Card view
?

Something wrong, or an idea?

Report a bug, suggest a feature or ask a question from inside the app. Every ticket reaches a person.

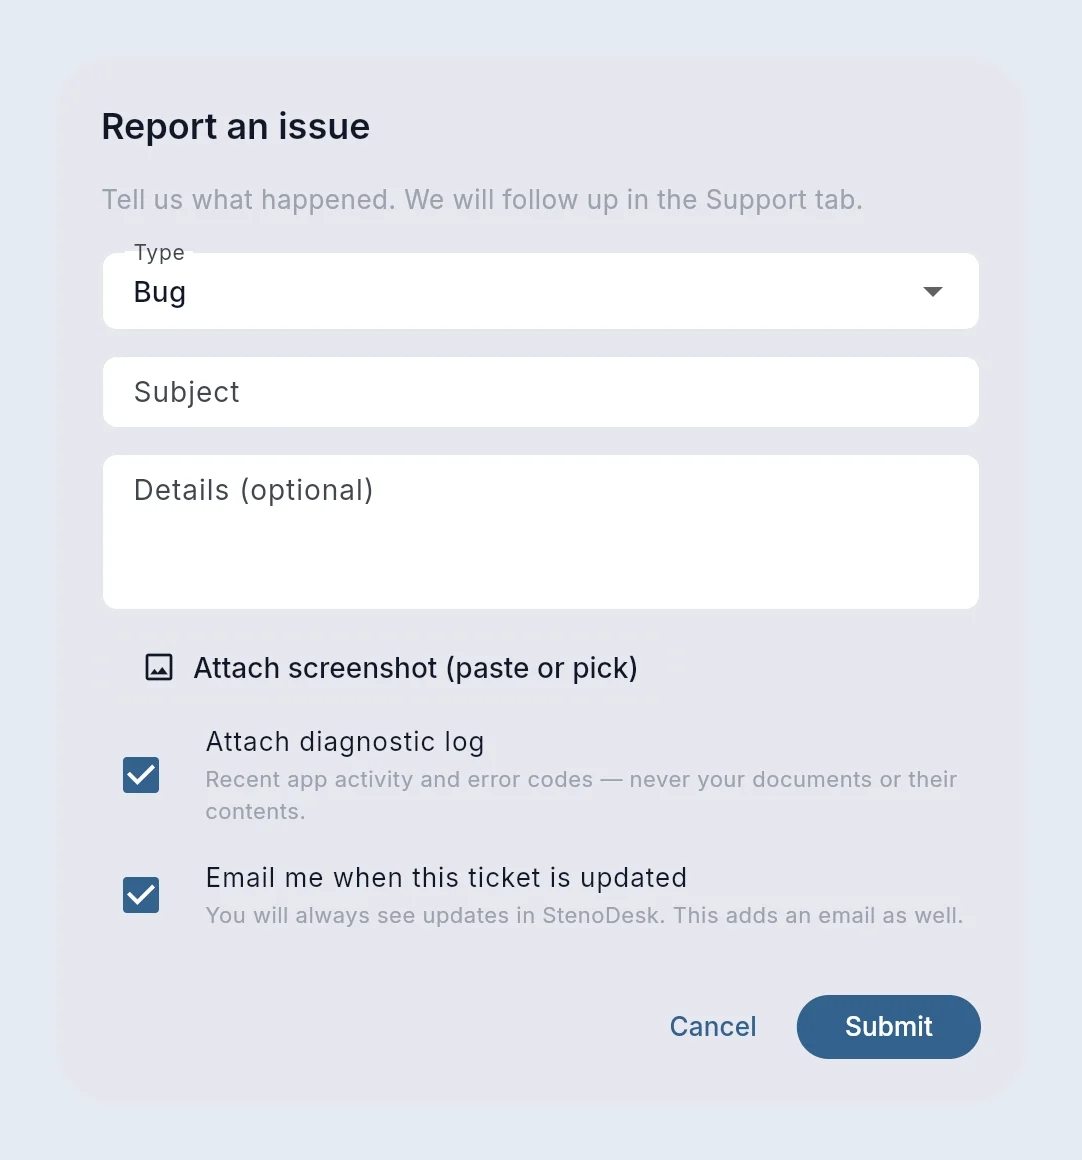
  1. Press the question-mark button in the bottom right corner of any page and choose Report an issue. The ticket then notes which page you were on. The same form is under Support in the left menu, as New ticket.
  2. Pick a Type: bug, feature request, question or other.
  3. Give it a one-line Subject, then in Details say what you expected and what happened instead. The more specific, the faster the fix.
  4. Add a screenshot or a few: paste one with Ctrl+V (or Cmd+V on a Mac), or pick a file. Up to six per ticket.
  5. Leave Attach diagnostic log on for bugs. It sends a short technical record of what the app was doing, with no file contents or transcript text in it.
  6. Keep Email me when this ticket is updated on, then press Submit.

Replies land on the Support page and in your inbox. The same question-mark button also opens the in-app User guide, a chat with the help assistant that answers most questions on the spot, and Book an onboarding call.

The Report an issue form: type, subject, details, screenshots, diagnostic log and email updates
+

There is a lot more to explore

This guide covers the basics of StenoDesk. Once you are set up, have a look at:

  • Proofreading, including a check of your transcript against the audio or video.
  • Workflow automation: the job moves from you to your scopist to your proofreader with one click per stage, with files, deadlines and hand-off emails handled in StenoDesk instead of emailed back and forth.
  • Case prep: a glossary and prep sheet built from the notice and your files.
  • Exhibit requests that follow up with counsel for you until the exhibits arrive.
  • Finances: expenses from receipts, what you keep after editors, and a quarterly tax estimate.
  • Cloud backup of your job files to Dropbox or Google Drive.
  • Worksheets and appearance pages generated from the job.
  • And a lot more, all of it from your phone's browser as well as your desk.

For the full picture, open the user guide in the app under Support, or book a free setup call if you would like a hand with any of these.

Rather do it together?

Book a free 30-minute call and we will set up your clients, rate sheet and first job with you.

Book a setup call